Introduction to the Ultimate No-Bake Halloween Treat
When Halloween rolls around, the last thing you want is to spend hours in the kitchen crafting elaborate desserts. Instead, why not embrace the spooky season with the ultimate no-bake Halloween treat? These delicious creations are not only easy to whip up but also allow you to showcase your creativity without the hassle of baking.
Why No-Bake Treats Are Perfect for Halloween
So, why are no-bake treats the perfect choice for Halloween festivities? For starters, they save you precious time. With all the planning involved in costume shopping and party organizing, the last thing you need is to worry about preheating ovens or waiting for cakes to cool. No-bake treats are quick, allowing you to focus on the fun parts of the holiday.
Moreover, these treats can be made ahead of time and stored in your refrigerator, making them convenient for last-minute gatherings. Imagine being the life of the party by presenting a delectable dessert that you didn’t even have to turn the oven on for! According to a recent survey by The Food Network, over 60% of home cooks prefer quick and easy recipes, especially during busy months like Halloween.
In addition to convenience, no-bake treats are incredibly versatile. You can get creative with various ingredients—from festive candies and chocolate to wholesome nuts and dried fruits. The options are practically endless, making it easy to cater to different dietary preferences. For example, you can swap out regular chocolate for dark chocolate or use alternative sweeteners.
Finally, there’s something so delightful about deconstructing the traditional Halloween treats we grew up loving. People often appreciate modern twists on nostalgic favorites, turning a classic treat into something refreshing and fun. Whether you’re hosting a Halloween bash or simply enjoying the season with friends, serving an inventive no-bake treat is sure to impress and delight.
Stay tuned for the upcoming sections, where we’ll dive into the recipe itself and unveil how to make the ultimate no-bake Halloween treat that will elevate your spooky celebrations!

Ingredients for the Ultimate No-Bake Halloween Treat
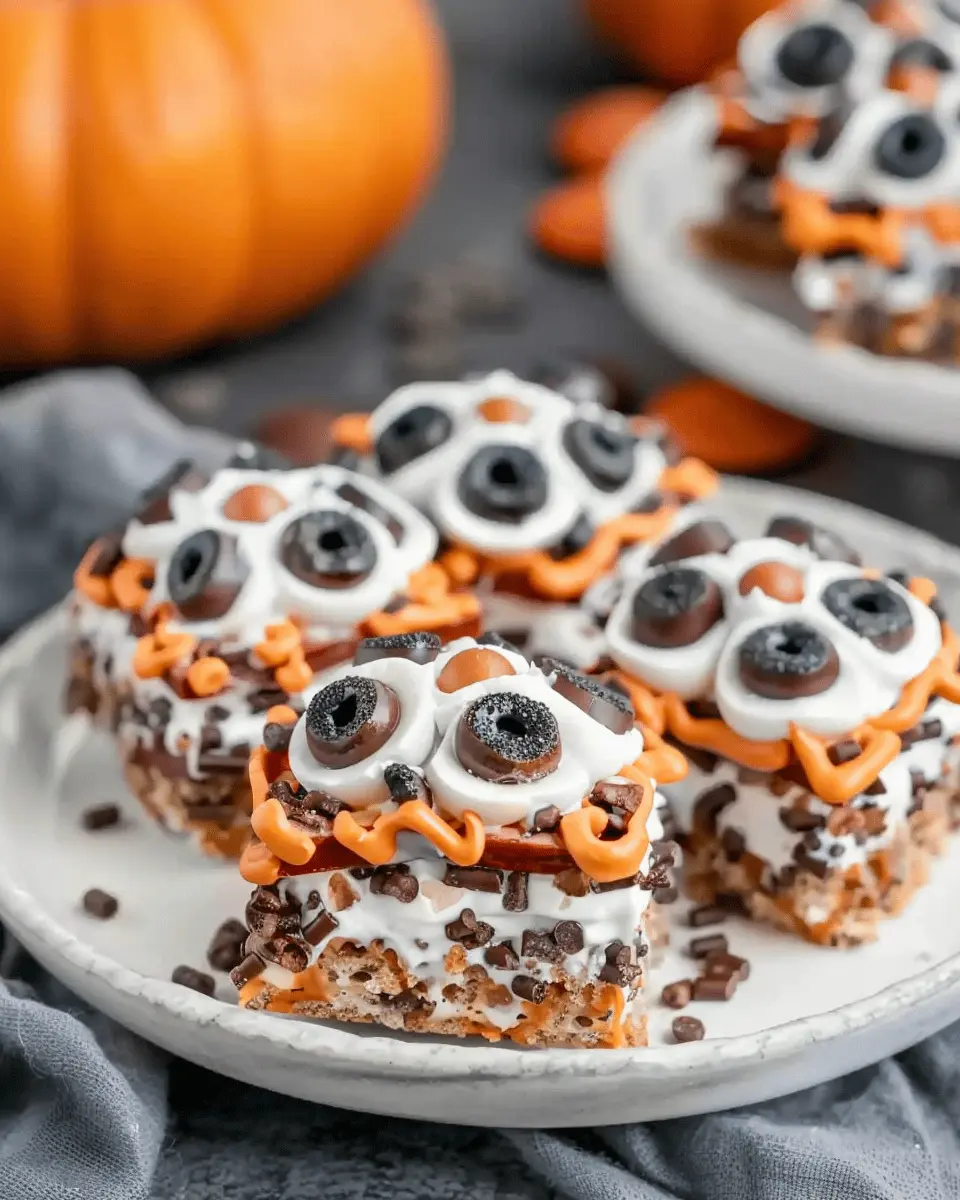
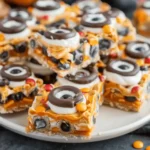
Creating the ultimate no-bake Halloween treat is all about gathering the right ingredients. In this case, we’re whipping up some delightful Pretzels Monster Eyeballs that are perfect for a spooky celebration. Here’s what you’ll need:
List of Ingredients for Pretzels Monster Eyeballs
- Regular pretzels: These act as the base and give a nice crunch.
- White chocolate chips: Melted and used for coating, they add a creamy sweetness.
- Candy eyes: The stars of the show! Choose various sizes for a fun effect.
- Peanut butter M&Ms: For the perfect and colorful “pupil” to complete your eyeballs.
- Black melting chocolate: Use this to enhance the creepy look and detail.
- Sprinkles (optional): To give your treats an extra festive touch, consider Halloween-themed sprinkles.
With these simple yet effective ingredients, you’re well on your way to crafting a fun, delicious treat that your friends and family will love. If you’re still in search of more spooky ideas, check out Food Network for inspiration!
Step-by-Step Preparation of Pretzels Monster Eyeballs
Creating the ultimate no-bake Halloween treat is as much about the process as it is about the delicious result. These Pretzels Monster Eyeballs are not only fun to make, but they also add a charmingly creepy touch to your Halloween festivities. Follow these simple, step-by-step instructions to ensure your treats turn out perfectly.
Preheat the Oven and Prepare Your Baking Sheet
Begin by preheating your oven to 350°F (175°C). While the oven is heating, grab a baking sheet and line it with parchment paper. This will prevent your treats from sticking and ensure easy cleanup later on. If you have a silicone mat, that also works perfectly! Lining your baking sheet is key to a successful batch, as it allows you to easily transfer your finished treats.
Arrange the Pretzels for Assembly
Once your baking sheet is ready, it’s time to set up your pretzels. You’ll need mini pretzels for this recipe—these will be the “base” for your monster eyeballs. Place them in rows on the lined baking sheet, leaving enough space in between each pretzel. About a dozen will fit nicely, depending on the size of your sheet. This is where the creativity starts! You can create patterns or clusters to give your treats some personality.
Unwrapping and Positioning the Hershey Hugs
Now for the fun part: unwrapping the Hershey Hugs! You’ll need one for each pretzel, so set aside some time for this step. As you unwrap, try not to sample too many—though I won’t judge if you do! Position a Hershey Hug on top of each pretzel. The key here is to center it well so it melts evenly during baking. If you’re picky about presentation, you might want to ensure that the points of the Hugs are facing upward for that extra visual effect.
Baking to Perfection
With your pretzels and Hershey Hugs assembled, it’s time for the oven! Place the baking sheet inside and allow them to bake for approximately 5-7 minutes. You’ll know they’re ready when the Hershey Hugs look shiny and slightly softened but not completely melted. Keep a close eye on them; over-baking can lead to a melted puddle rather than a charming eyeball!
Adding the Spooky Touch
After you’ve removed the baking sheet from the oven and let it sit for a minute, it’s time to add the spooky touch to your ultimate no-bake Halloween treat. Using candy eyes, gently press one onto each melted Hershey Hug. You can also get creative and use edible glitter or colorful sprinkles for additional flair! This is your chance to personalize these monster eyeballs, so feel free to mix it up and have fun!
Cooling and Hardening the Treats
Allow your Pretzels Monster Eyeballs to cool down completely on the baking sheet. They’ll firm up as they cool, creating that satisfying crunch we all crave. If you’re in a hurry, you can pop them in the refrigerator for about 10-15 minutes to speed up this process. Once fully cooled, transfer your treats to a festive container for serving. You might want to make extra, as these will disappear quickly!
By the end of this process, you’ll have created a spooky, delightful treat perfect for Halloween festivities. Not only do they add a whimsical flair to your celebrations, but they’re also a hit among friends and family. Try these out and see why they’re considered the ultimate no-bake Halloween treat! Be sure to check out other creative Halloween ideas at sites like Food Network or Bon Appétit for even more delicious recipes. Happy Halloween baking!
Variations on the Ultimate No-Bake Halloween Treat
Spooky Peanut Butter Versions
Transforming the ultimate no-bake Halloween treat into a peanut butter extravaganza is a delicious way to embrace the spooky season. Start by blending creamy peanut butter with softened cream cheese for a richer base. For those who prefer a little crunch, consider mixing in crushed Turkey Bacon bits or a sprinkle of crispy rice cereal. You can also layer this mixture over a simple crust made from crushed graham crackers for a textural delight.
Feeling adventurous? Add a touch of pumpkin spice to your peanut butter mix for a seasonal twist that pairs beautifully with fall flavors. Not only will this treat satisfy those sweet cravings, but it will also make your friends think you’re the Halloween treat guru!
Themed Sprinkles and Colors
No Halloween treat is complete without some festive flair. Once you’ve perfected your no-bake dessert, take the appeal up a notch with creative toppings. Look for Halloween-themed sprinkles like ghosts, pumpkins, or bats. You can even dip your treats in colorful melted chocolate—think orange, black, and green—to truly capture the spirit of Halloween.
For an added fun factor, why not let your guests get involved? Set up a mini topping bar with various sprinkles and edible glitter, encouraging everyone to customize their own creations. This not only enhances the experience but also adds an interactive element to your celebration.
Deliver some spooky surprises this October and enjoy whipping up these variations on the ultimate no-bake Halloween treat. For more inspiration, check out resources like Food Network and Delish for creative ideas!
Cooking Tips and Notes for the Ultimate No-Bake Halloween Treat
Avoiding Chocolate Overbake
When making the ultimate no-bake Halloween treat, it’s crucial to melt your chocolate just right. Overheating can lead to a grainy texture, ruining that smooth, indulgent finish. Use gentle heat—consider a double boiler or microwave in short bursts, stirring frequently. Remember, chocolate retains its shape even when melted, so don’t be tempted to keep it on the heat longer than necessary. For a creamy finish, try adding a teaspoon of coconut oil to the chocolate; this not only enhances the flavor but also ensures a silky consistency.
Tips for Best Stickage with Candy Eyes
If you’re decorating with candy eyes for a spooky touch, ensure they stick perfectly! The trick is to maintain some adhesiveness with your melted chocolate. Apply the eyes while the chocolate is warm; this helps them bond better. If they still seem reluctant, a dab of frosting or peanut butter can help secure them. Plus, if you haven’t tried different candy varieties for decoration, now’s the time to explore! Mixing in gummy worms or festive sprinkles can bring even more flair to your ultimate no-bake Halloween treat.
Keep these tips in mind, and you’ll be whipping up delightful, no-bake creations that are sure to impress at any Halloween gathering. Enjoy the process, and don’t forget to share your monster-munching moments with friends! Check out resources like The Food Lab for more hints and insights on mastering your favorite treats.

Serving Suggestions for the Ultimate No-Bake Halloween Treat
Creative Plating Ideas for Halloween Parties
To elevate the ultimate no-bake Halloween treat, think outside the box with your presentation! Consider using black or orange dishes to enhance that festive vibe.
- Witch’s Cauldron: Serve your treats in a small, decorative cauldron for an extra festive touch.
- Spooky Graveyard: Crumble chocolate cookies as “dirt” and place gummy worms for a frightful effect.
- Mini Jars: Stack layers of the treat in small mason jars for easy grab-and-go servings.
These ideas don’t just look good; they spark conversation among your guests, making the experience more memorable!
Pairing with Other Halloween Treats
Why stop at one treat? Imagine your no-bake creation alongside other Halloween delights. Pair your treat with:
- Monster Cookies: Use these colorful cookies for a fun contrast.
- Fruity Ghosts: Bananas dipped in white chocolate with chocolate chip eyes provide a healthy option.
- Pumpkin Pops: Chocolate-covered pumpkin spice donuts add a seasonal flavor.
These combinations create a delightful spread sure to wow your guests. For even more Halloween ideas, consider checking out resources from The Food Network for inspiration!
Time Breakdown for the Ultimate No-Bake Halloween Treat
When it comes to preparing the ultimate no-bake Halloween treat, understanding your time commitments can help you stay organized and stress-free. Here’s a quick breakdown to guide you.
Preparation Time
You’ll spend about 20-30 minutes gathering your ingredients and mixing everything together. This is the perfect time to embrace your inner mad scientist and let your creativity flow! As you whip up your mixture, consider playing some fun Halloween tunes to set the mood.
Chilling Time
After your treat is prepared, it will need to chill in the refrigerator for at least 1 hour. This helps the flavors meld beautifully and ensures that your creation holds its shape. While you wait, why not treat yourself to an episode of your favorite show?
Total Time
Overall, you’re looking at approximately 1.5 hours from start to finish. This makes it an ideal recipe for last-minute Halloween gatherings or a cozy night in. With minimal effort and time, you’ll savor the joy of creating something festive and delicious.
For more fun Halloween ideas and recipes, check out The Spruce Eats or Allrecipes. Each site has a treasure trove of culinary creativity just waiting to inspire your next treat.
Nutritional Facts for the Ultimate No-Bake Halloween Treat
Caloric Content
When indulging in the ultimate no-bake Halloween treat, moderation is key! Each serving packs around 150 calories, making it a delightful yet guilt-free option for your festivities. Enjoying a sweet treat doesn’t mean straying from your health goals, especially when made with wholesome ingredients.
Nutritional Breakdown
Let’s take a closer look at what makes this treat both delicious and nutritious:
- Protein: Approximately 4 grams per serving, thanks to ingredients like nuts or Greek yogurt.
- Fiber: About 2 grams, helping you feel full and satisfied.
- Healthy Fats: The use of nut butter contributes beneficial fats, which can help in heart health.
- Sugar: Around 5 grams, primarily from natural sources rather than refined sugars.
Want more insights on healthy eating during the holidays? Check out Healthline’s article on nutritious options for more tips!
FAQs About the Ultimate No-Bake Halloween Treat
Can These Treats Be Made in Advance?
Absolutely! One of the best features of the ultimate no-bake Halloween treat is its flexibility when it comes to making it ahead of time. You can prepare the mixture and even shape your treats a day or two in advance. Just keep them stored in an airtight container in the refrigerator to maintain their freshness. This way, you can free up time closer to the holiday for your spooky plans.
What Are Some Fun Ways to Decorate?
Don’t be afraid to let your creativity shine when it comes to decorating! Here are a few ideas to get you started:
- Sprinkles: Use Halloween-themed sprinkles to add a festive touch. Think black, orange, and even edible glitter for some sparkle.
- Chocolate Drizzle: Melt some chocolate and drizzle it over your treats for a delicious finish.
- Themed Toppers: Use mini toys or edible decorations like gummy worms or candy eyeballs to really amp up the Halloween spirit.
- Colored Frosting: Add a spooky swirl of colored frosting for an eye-catching presentation.
Check out Pinterest for thousands of ideas on Halloween treats that can excite your guests!
Are There Any Allergen-Free Options Available?
Definitely! If you’re catering to guests with allergies, you can easily customize the ultimate no-bake Halloween treat. Consider using allergen-free ingredients like:
- Nut Butters: Substitute traditional nut butters with sunbutter made from sunflower seeds.
- Gluten-Free Options: Ensure you choose gluten-free oats or other alternatives to accommodate gluten sensitivities.
- Vegan Choices: Replace honey or dairy with maple syrup and coconut yogurt for a vegan spin.
Always be sure to check labels or consult your guests to ensure everyone can join in the fun without worry. For more detailed information on allergy-friendly recipes, you can visit Kids With Food Allergies.
Conclusion on the Ultimate No-Bake Halloween Treat
Creating the ultimate no-bake Halloween treat is not just about quick and easy preparation—it’s about enjoying the festive spirit with friends and family without the stress of baking. With just a few simple ingredients, you can whip up delightful snacks that are sure to impress.
Imagine your guests delighting in these spooky yet scrumptious bites. Plus, you’ll have more time to relish in holiday festivities! If you’re looking for inspiration, check out more fun Halloween recipes on sites like AllRecipes or Food Network to elevate your spooky gatherings. Embrace the spirit of Halloween with these treats, and let the fun begin!
PrintThe Ultimate No-Bake Halloween Treat: Spooky & Delicious Delights
Discover how to create delicious no-bake Halloween treats that are both spooky and delightful. Perfect for parties or fun activities with kids.
- Prep Time: 20 minutes
- Cook Time: 0 minutes
- Total Time: 1 hour 20 minutes
- Yield: 24 treats 1x
- Category: Desserts
- Method: no-bake
- Cuisine: American
- Diet: vegetarian
Ingredients
- 2 cups graham cracker crumbs
- 1 cup unsweetened cocoa powder
- 1 cup powdered sugar
- 1/2 cup unsalted butter, melted
- 1 teaspoon vanilla extract
- 1 cup Halloween-themed sprinkles
Instructions
- In a mixing bowl, combine graham cracker crumbs, cocoa powder, and powdered sugar.
- Add melted butter and vanilla extract, then mix until well combined.
- Form the mixture into small balls and roll them in the Halloween sprinkles.
- Place the treats on a baking sheet lined with parchment paper and refrigerate for at least one hour.
- Serve chilled and enjoy your spooky treats!
Notes
- Feel free to add nuts or dried fruits for extra flavor.
- You can also use different types of sprinkles depending on your theme.
Nutrition
- Serving Size: 1 treat
- Calories: 150
- Sugar: 10g
- Sodium: 50mg
- Fat: 7g
- Saturated Fat: 4g
- Unsaturated Fat: 3g
- Trans Fat: 0g
- Carbohydrates: 20g
- Fiber: 1g
- Protein: 2g
- Cholesterol: 15mg
Keywords: Halloween, no-bake treats, spooky desserts