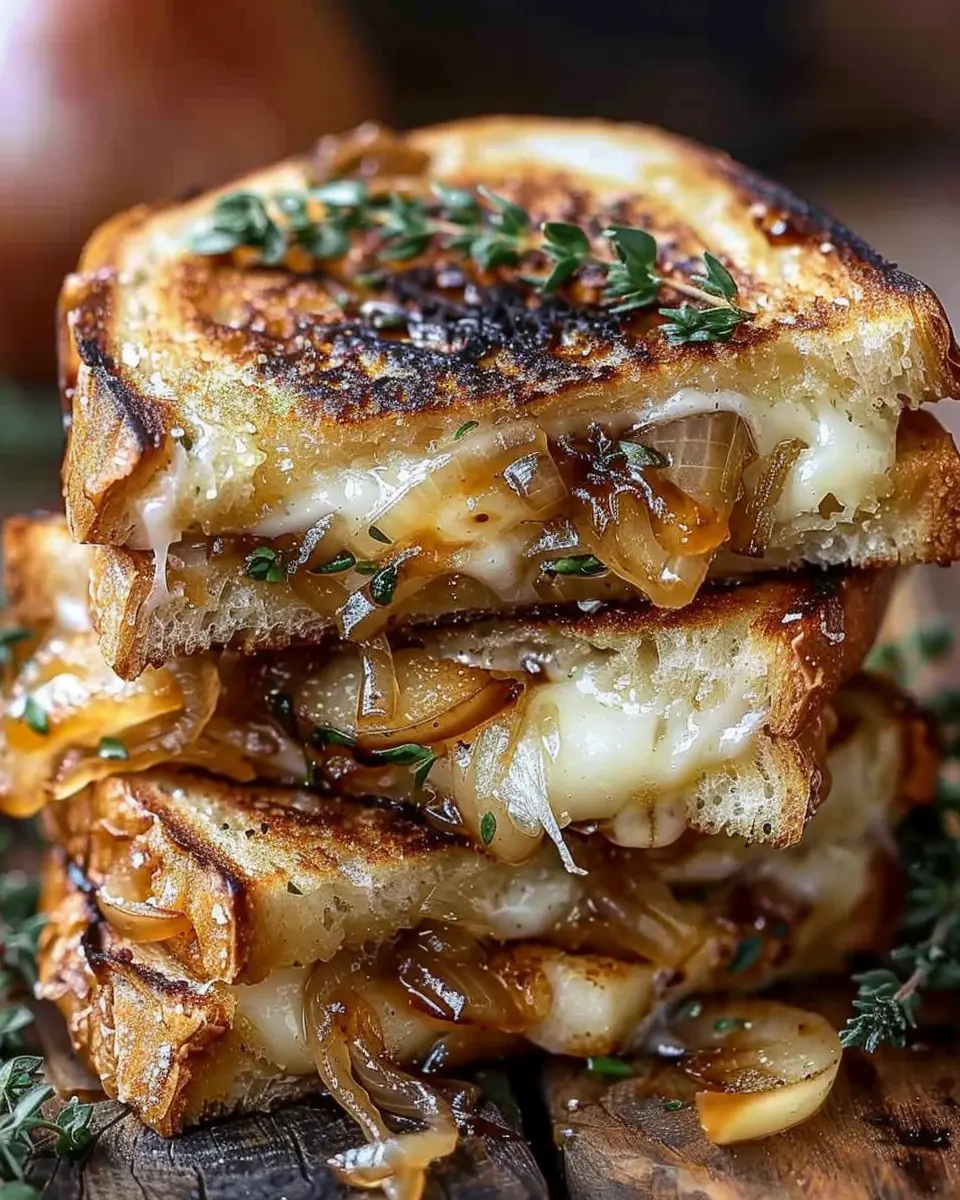
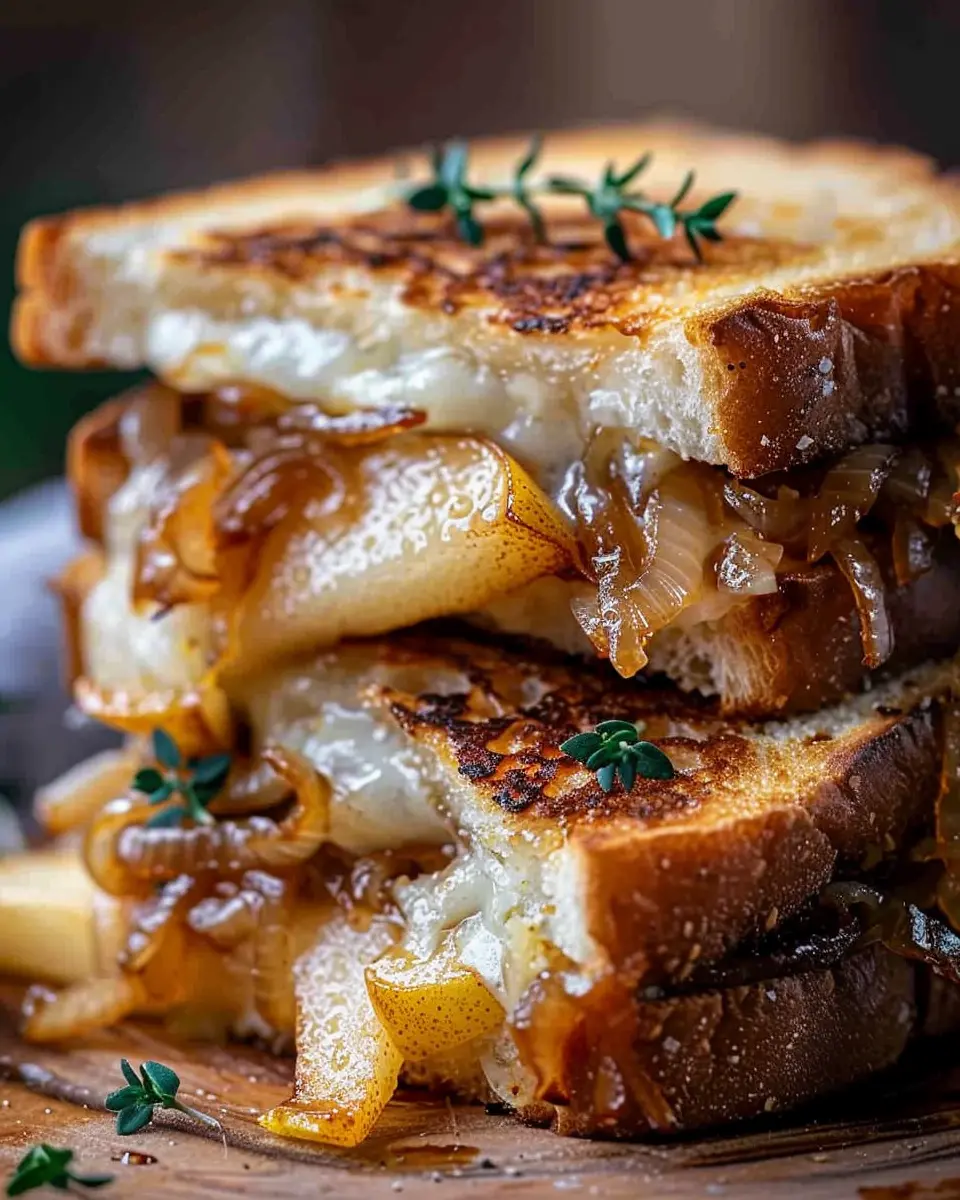
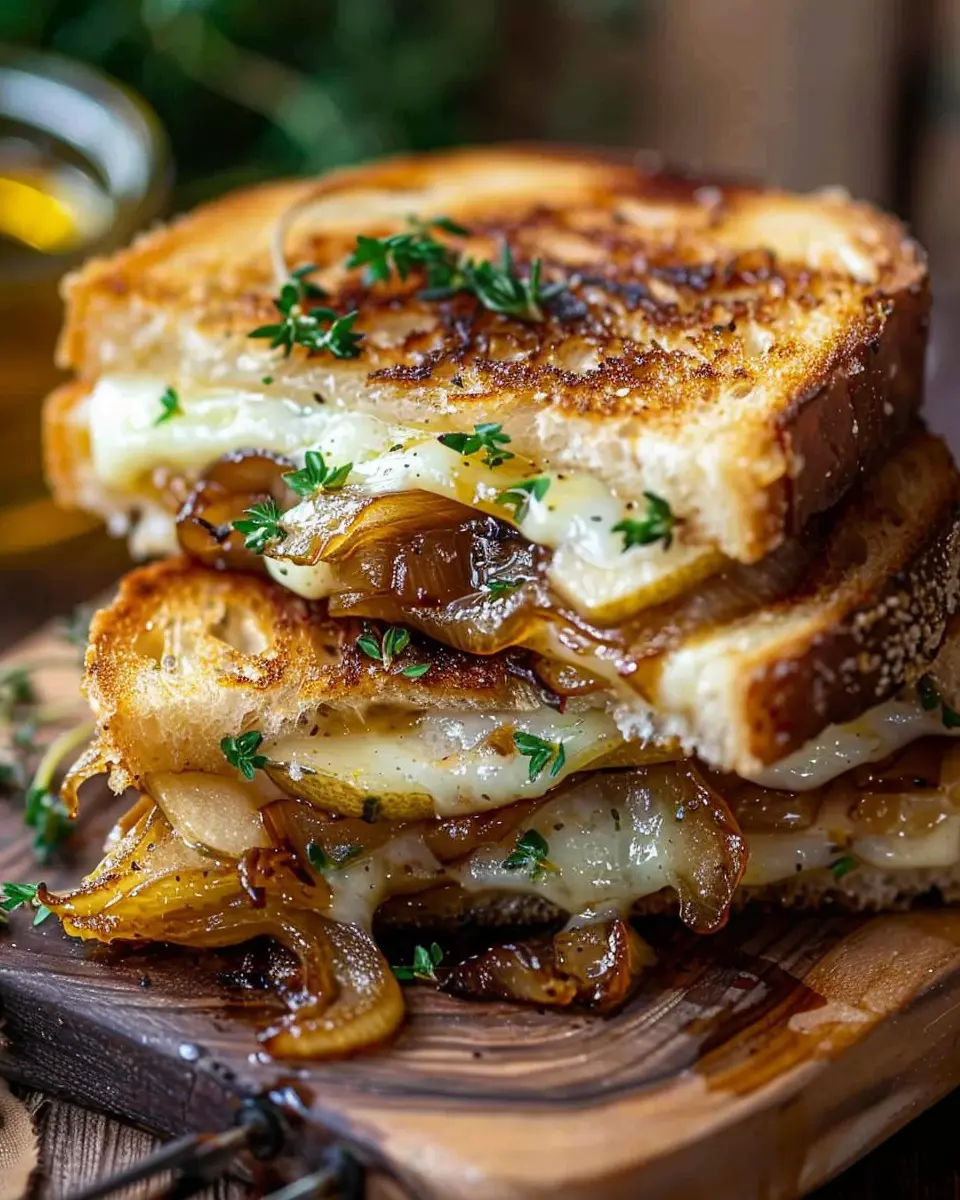
Introduction to Pear & Apple Grilled Cheese
If you’re juggling a busy lifestyle, finding quick and delicious meal options is essential for maintaining both energy levels and culinary enjoyment. This is where the Pear & Apple Grilled Cheese comes into play, transforming a classic comfort food into a gourmet delight that’s both easy and satisfying. Imagine melting, creamy cheese paired with the sweetness of ripe pears and apples, all nestled between crispy, golden-brown bread. It’s a unique twist on the traditional grilled cheese that’s sure to impress.
Why Pear & Apple Grilled Cheese is a Game Changer for Young Professionals
For many young professionals, every meal has to work harder—it’s not just about feeding the body but also about fueling ambition. The Pear & Apple Grilled Cheese is an ingenious solution to time constraints, as it can be whipped up in just 15 minutes! Not only does it provide comfort after a long working day, it also packs a nutritional punch.
-
Fresh Ingredients: Incorporating fruits like pears and apples adds natural sweetness and important vitamins, contributing to your overall wellness. According to the USDA, apples are great sources of fiber and vitamin C, while pears boast potassium and heart-healthy antioxidants.
-
Customizable: You can easily adjust the flavors by adding turkey bacon or chicken ham for protein or switching up the cheeses to cater to your taste preferences. This versatility makes it not just quick, but personalized.
-
Engaging Experience: Cooking this dish allows you to unleash your creativity in the kitchen. You might even find yourself indulging in some culinary experimentation! Have you ever tried adding a touch of ginger or cinnamon? The possibilities are endless.
Whether you’re preparing a solo dinner or impressing friends with your culinary skills for a cozy get-together, this grilled cheese sandwich delivers on taste and simplicity. The combination of caramelized onions adds a richness that elevates the dish beyond standard fare.
Want to learn more about the nutritional benefits of including fruits in your diet? Check out this resource from Healthline.
Ready to dive into this delightful recipe? You won’t regret indulging in the Pear & Apple Grilled Cheese With Caramelized Onions. It could just become your new go-to meal!
Ingredients for Pear & Apple Grilled Cheese
Essential Ingredients for the Perfect Sandwich
Creating a delightful Pear & Apple Grilled Cheese is all about choosing the right ingredients. Here’s what you’ll need:
- Bread: Opt for a thick, crusty bread like sourdough or a hearty whole grain to hold up against the juicy fillings.
- Cheese: Go for creamy, melty cheese – sharp cheddar or gouda works beautifully for that savory-sweet balance.
- Pears and Apples: Use ripe pears and tart apples (like Granny Smith) for a refreshing crunch.
- Caramelized Onions: These add depth and richness. Take your time cooking them down till they’re golden and sweet.
- Butter: For that perfect golden crust, butter is essential for frying.
Feeling adventurous? For a deeper dive into the magic of cheese, consider checking out this insightful article on cheese pairing here.
Optional Add-Ons to Enhance Flavor
Want to elevate your Pear & Apple Grilled Cheese even further? Here are some tasty add-ons to consider:
- Turkey Bacon: A savory twist that complements the sweetness of the fruits.
- Chicken Ham: Adds a subtle umami flavor that balances out the dish.
- Spices: A pinch of cinnamon or nutmeg can add warmth and complexity.
These optional ingredients can take your grilled cheese from ordinary to extraordinary! Experiment with what you love and create a quick meal that’s sure to impress.
Step-by-Step Preparation of Pear & Apple Grilled Cheese
Grilled cheese sandwiches hold a special place in many of our hearts, and when you add the delightful flavors of pears, apples, and caramelized onions, it becomes a gourmet experience that’s still totally approachable. Let’s dive into the preparation of this Pear & Apple Grilled Cheese that will leave your taste buds dancing.
Gather Your Tools and Ingredients
Before you start this culinary adventure, let’s ensure you have everything you need on hand:
Essential Tools:
- Non-stick skillet or frying pan
- Cutting board
- Sharp knife
- Spatula
- Cheese grater (if using block cheese)
- Serving plate
Ingredients:
For 2 sandwiches, you’ll need:
- 4 slices of your favorite bread (sourdough, whole-grain, or even multigrain work well)
- 1 medium ripe pear, thinly sliced
- 1 medium apple, thinly sliced (Granny Smith or Honeycrisp are great)
- 1 large onion, sliced
- 4 slices of cheese (Swiss, cheddar, or gouda are excellent choices)
- 2 tablespoons of butter
- A drizzle of honey or maple syrup (optional, for extra sweetness)
- Salt and pepper to taste
Now that you’ve gathered your tools and ingredients, it’s time to start cooking!
Caramelize the Onions to Perfection
Caramelizing onions might sound daunting, but it’s simpler than you think. Grab your skillet and follow these steps:
- Melt the Butter: Place your skillet over medium heat and add 1 tablespoon of butter.
- Add the Onions: Once the butter is melted, toss in the sliced onions, a pinch of salt, and pepper.
- Cook Low and Slow: Stir them occasionally. The key to perfect caramelized onions is patience—allow them to cook for about 20-30 minutes until they’re golden brown and sweet! If you’re eager for quicker results, check out this caramelization guide to learn tips from the pros.
Layering the Sandwich Like a Pro
Now comes the fun part—building your Pear & Apple Grilled Cheese! Here’s how to do it:
- First Slice of Bread: Start with a slice of bread and layer it with your preferred cheese.
- Add the Fruits and Onions: Place a few slices of pear and apple on top of the cheese. Follow with a layer of those deliciously caramelized onions.
- Top with More Cheese: Add another slice of cheese on top for that melty goodness.
- Finalize the Sandwich: Finish off with the second slice of bread. If you choose, you can drizzle a touch of honey or maple syrup inside for additional flavor.
Grilling the Sandwich to Golden Brown
Get ready to cook! Here’s how to grill your creation:
- Heat the Skillet: In the same skillet, add another tablespoon of butter over medium heat.
- Place the Sandwiches: Once the butter is sizzling, carefully place your assembled sandwiches in the pan.
- Grill Until Golden: Cook on one side for about 3-4 minutes, or until you see that golden brown crust. Then, flip them gently (using your spatula) and grill the other side to perfection—another 3-4 minutes should do it.
Serving Your Masterpiece
Ah, the moment of truth! Once your sandwiches are grilled to a beautiful golden hue, it’s time to serve. Here’s how to elevate your presentation:
- Slice the Sandwiches: Cut them diagonally and arrange them on a plate.
- Garnish Your Dish: Consider adding a fresh side salad or your favorite dipping sauce, like a balsamic reduction or even just some spicy mustard.
- Enjoy Each Bite: Pair your Pear & Apple Grilled Cheese with a warm cup of tea or a refreshing cider for balance. You’ll be amazed at how well the flavors complement each other!
Now that your culinary masterpiece is complete, it’s time to savor every mouthful. Not only is this recipe quick and simple, but it’s also a delightful way to impress your friends during a casual brunch or a cozy night in. Happy cooking!

Variations on Pear & Apple Grilled Cheese
When it comes to Pear & Apple Grilled Cheese, the possibilities are endless! You can easily customize this delightful dish to suit your mood and taste preferences. Let’s dive into some variations that will elevate your grilled cheese game.
Adding Meat: Turkey Bacon and Chicken Ham Versions
For those who enjoy a heartier meal, consider adding turkey bacon or chicken ham to your Pear & Apple Grilled Cheese. Both options provide a savory contrast to the sweetness of the fruit.
- Turkey Bacon: The smoky flavor of turkey bacon pairs beautifully with the caramelized onions and fruit. Simply crisp up some turkey bacon and layer it in before grilling.
- Chicken Ham: If you prefer a lighter option, chicken ham adds a subtle savory element that enhances this sandwich’s overall flavor profile.
Not only do these meats add texture, but they also introduce a satisfying protein element that makes this meal even more filling. Curious about the health benefits of adding protein to your meals? Check out this Healthy Eating Guide for some insights.
Exploring Cheese Options: Gouda and Mozzarella
When it comes to cheese, think beyond the usual choices. While sharp cheddar is classic, combining Gouda or mozzarella can take your Pear & Apple Grilled Cheese to new culinary heights.
- Gouda: This cheese has a rich, nutty flavor that complements the fruity elements beautifully. Its excellent melting qualities ensure a creamy texture in every bite.
- Mozzarella: For a lighter, stretchier experience, mozzarella can be a game-changer. Its mildness allows the pears and apples to shine, making for a deliciously balanced sandwich.
Try experimenting with these cheeses to find your perfect match! Not sure which cheese to choose? Check out this Comprehensive Cheese Guide for tips and tricks on selecting the best cheese for your dishes.
With these variations in mind, feel free to get creative and make this Pear & Apple Grilled Cheese your own!
Cooking Tips and Notes for Pear & Apple Grilled Cheese
How to Avoid Soggy Bread
Achieving that perfect crispy exterior is essential for a delightful Pear & Apple Grilled Cheese experience. Here’s how to keep your bread from becoming a soggy mess:
- Use Thick Slices: Opt for thicker bread, which provides a sturdier base and helps prevent moisture from seeping in.
- Toast It First: Give your bread a light toasting in advance. This creates a barrier against moisture while adding extra flavor.
- Mind the Cheese: Grate or slice cheese thinly and sprinkle on just enough to cover the bread; too much can lead to excess moisture.
Tips for Selecting the Best Fruits
Choosing the right fruits can elevate your grilled cheese. When picking pears and apples:
- Go for Firmness: Look for fruits that are firm to the touch but slightly yielding—this indicates ripeness without being overripe.
- Try Different Varieties: Experiment with cheese-friendly options like Bartlett pears and Granny Smith apples, which provide a lovely contrast in flavors.
For more helpful tips, check out [this fruit selection guide from the USDA](https://www USDA.gov) and always aim for seasonal selections that pack in more flavor. Enjoy your culinary adventure!
Serving Suggestions for Pear & Apple Grilled Cheese
Pairing with Soups and Salads
Elevate your Pear & Apple Grilled Cheese by pairing it with comforting soups or refreshing salads. A creamy tomato basil soup complements the sweetness of the caramelized onions beautifully. For a lighter option, try a simple mixed greens salad with a zesty vinaigrette to balance the richness of the grilled cheese. Another great choice is a butternut squash soup, which adds a touch of autumn to your plate. If you’re looking for more ideas, check out Food & Wine’s soup pairings for inspiration.
Lunch Box Ideas for Professionals on the Go
Busy days don’t mean compromising on flavor! Your Pear & Apple Grilled Cheese can be easily packed for lunch. Slice the sandwich into manageable pieces and include a small container of your favorite dipping sauce, like honey mustard or a balsamic reduction. For added variety, throw in some turkey bacon or thinly sliced chicken ham, if you like that extra protein boost. Pair it with apple slices or a handful of nuts for healthy snacking, and you’ve got a delicious, satisfying meal to fuel your day!
Time Breakdown for Making Pear & Apple Grilled Cheese
When you’re in the mood for something quick yet delightful, making Pear & Apple Grilled Cheese with Caramelized Onions is a fantastic choice. Here’s how to manage your time efficiently.
Preparation Time
You’ll need about 10–15 minutes to gather your ingredients and prep. Slice the pears and apples, chop the onions, and get your cheese handy. Pro tip: have everything ready to go—this speeds up the process!
Cooking Time
The cooking will take approximately 10 minutes. As you melt that cheese to gooey perfection and caramelize those onions, the aroma will have you drooling in no time.
Total Time
Overall, you’re looking at around 25–30 minutes from start to finish! It’s the perfect amount of time for a cozy weeknight meal. For tips on ingredient selection, check out this article on choosing the best cheeses. Happy grilling!
Nutritional Facts for Pear & Apple Grilled Cheese
Calories
Indulging in a Pear & Apple Grilled Cheese is a delightful experience that won’t break your calorie bank! Each serving typically contains around 400-500 calories, making it a satisfying choice for a quick lunch or dinner. It’s a well-balanced option when paired with a side salad or vegetable soup for a complete meal.
Protein Content
When it comes to protein, this dish offers about 15-20 grams per serving, depending on the type of cheese and any additional ingredients like Turkey Bacon or Chicken Ham you might add. This makes it a great option for young professionals looking to refuel after a busy day.
Dietary Considerations
If you’re mindful of dietary restrictions, the Pear & Apple Grilled Cheese can be easily adapted. Use gluten-free bread for those avoiding gluten, or switch to dairy-free cheese for a lactose-free option. It’s a versatile recipe that can cater to various dietary preferences while still delivering on flavor. For more nutritional insights, check out resources like the USDA FoodData Central or NutritionData.
FAQs about Pear & Apple Grilled Cheese
Can I make this sandwich vegan-friendly?
Absolutely, you can make a delightful Pear & Apple Grilled Cheese that’s vegan-friendly! Simply substitute dairy cheese with your favorite vegan cheese brands. There are so many delicious options available these days—from almond-based to cashew-based cheeses. For the butter on the bread, try using plant-based spreads or even olive oil for that perfect golden crust. Not only will you enjoy a satisfying flavor, but your vegan friends will thank you too!
What’s the best bread for grilling?
When it comes to choosing the best bread for your Pear & Apple Grilled Cheese, think about the texture and flavor. Sourdough, multigrain, and even French baguette slices work wonderfully. The slight tang of sourdough pairs beautifully with the sweetness of the pears and apples, while multigrain offers a hearty crunch. Whichever you choose, look for bread that can hold up to a good grilling without getting soggy—nobody likes a mushy sandwich!
How can I store leftovers?
If you find yourself with some extra slices of that mouthwatering Pear & Apple Grilled Cheese, don’t fret! Just cool them down to room temperature, then wrap them in plastic wrap or place them in an airtight container. You can store them in the refrigerator for up to three days. For a quick reheat, put them in the toaster or a skillet until heated through and crispy again. Trust me; it will taste just as good the second time around!
For more tips on cheese choices, check out this cheese pairing guide for further inspiration! And if you’re curious about bread options, take a look at these recommendations from Bread & Butter.
Conclusion on Pear & Apple Grilled Cheese
Final Thoughts on Elevating Your Grilled Cheese Experience
The Pear & Apple Grilled Cheese with Caramelized Onions is more than just a sandwich—it’s a culinary escape. While traditional grilled cheese may always hold a special place in our hearts, this creative twist invites you to explore new flavor horizons. Imagine biting into creamy melted cheese paired with the sweetness of fruit, all complemented by savory onions. It’s comfort food redefined.
Next time you crave a quick delight, why not elevate your grilled cheese experience? Try experimenting with different cheeses or adding your favorite proteins like Turkey Bacon or Chicken Ham. You might discover your new go-to dish. Check out more innovative recipes at Serious Eats for inspiration, and don’t hesitate to share your own twists on this classic!
PrintPear & Apple Grilled Cheese: A Quick Delight with Turkey Bacon
Enjoy the perfect combination of flavors with pear, apple, and turkey bacon in this delicious grilled cheese sandwich.
- Prep Time: 10 minutes
- Cook Time: 10 minutes
- Total Time: 20 minutes
- Yield: 1 serving 1x
- Category: Sandwich
- Method: Grilling
- Cuisine: American
- Diet: Omnivore
Ingredients
- 2 slices whole grain bread
- 1/2 cup shredded cheddar cheese
- 1/4 cup sliced pear
- 1/4 cup sliced apple
- 2 slices turkey bacon
- 1 tablespoon butter
Instructions
- Cook the turkey bacon in a skillet until crispy, then remove and set aside.
- In the same skillet, butter one side of each slice of bread.
- On the unbuttered side of one slice, layer cheddar cheese, sliced pear, sliced apple, and turkey bacon.
- Top with the second slice of bread, buttered side facing out.
- Cook in the skillet over medium heat until golden brown, then flip and cook the other side.
- Remove from skillet, slice, and serve warm.
Notes
- For added flavor, try using different types of cheese.
- Feel free to add some arugula for extra freshness.
Nutrition
- Serving Size: 1 sandwich
- Calories: 450
- Sugar: 5g
- Sodium: 650mg
- Fat: 25g
- Saturated Fat: 10g
- Unsaturated Fat: 12g
- Trans Fat: 0g
- Carbohydrates: 40g
- Fiber: 5g
- Protein: 20g
- Cholesterol: 30mg
Keywords: pear, apple, grilled cheese, turkey bacon, quick recipe