Introduction to Graveyard Pudding Cups for Halloween
Halloween is that delightful time of year when we can indulge our imaginations and let the creativity flow, particularly in the kitchen. One treat that perfectly embodies the spirit of this spooky season is Graveyard Pudding Cups. These visually striking desserts not only tickle the taste buds but also serve as a fantastic centerpiece for any Halloween gathering.
Why Graveyard Pudding Cups Are the Perfect Halloween Treat
So, why should you consider making Graveyard Pudding Cups Halloween a part of your spooky celebrations? Here are some fun reasons:
-
Allow for Personalization: Whether you’re a chocolate lover, a fan of vanilla, or even a health-conscious eater, Graveyard Pudding Cups can be customized to suit your tastes. You can easily swap in your favorite flavors of pudding or even add layers of fruit to give it a healthier spin.
-
Easy to Assemble: These pudding cups are simple to put together, making them perfect for both novice and seasoned bakers alike. You can involve your friends or family, turning it into a fun activity. Just layer the pudding, crushed cookies, and toppings, and you’ve got a delicious treat that looks impressive.
-
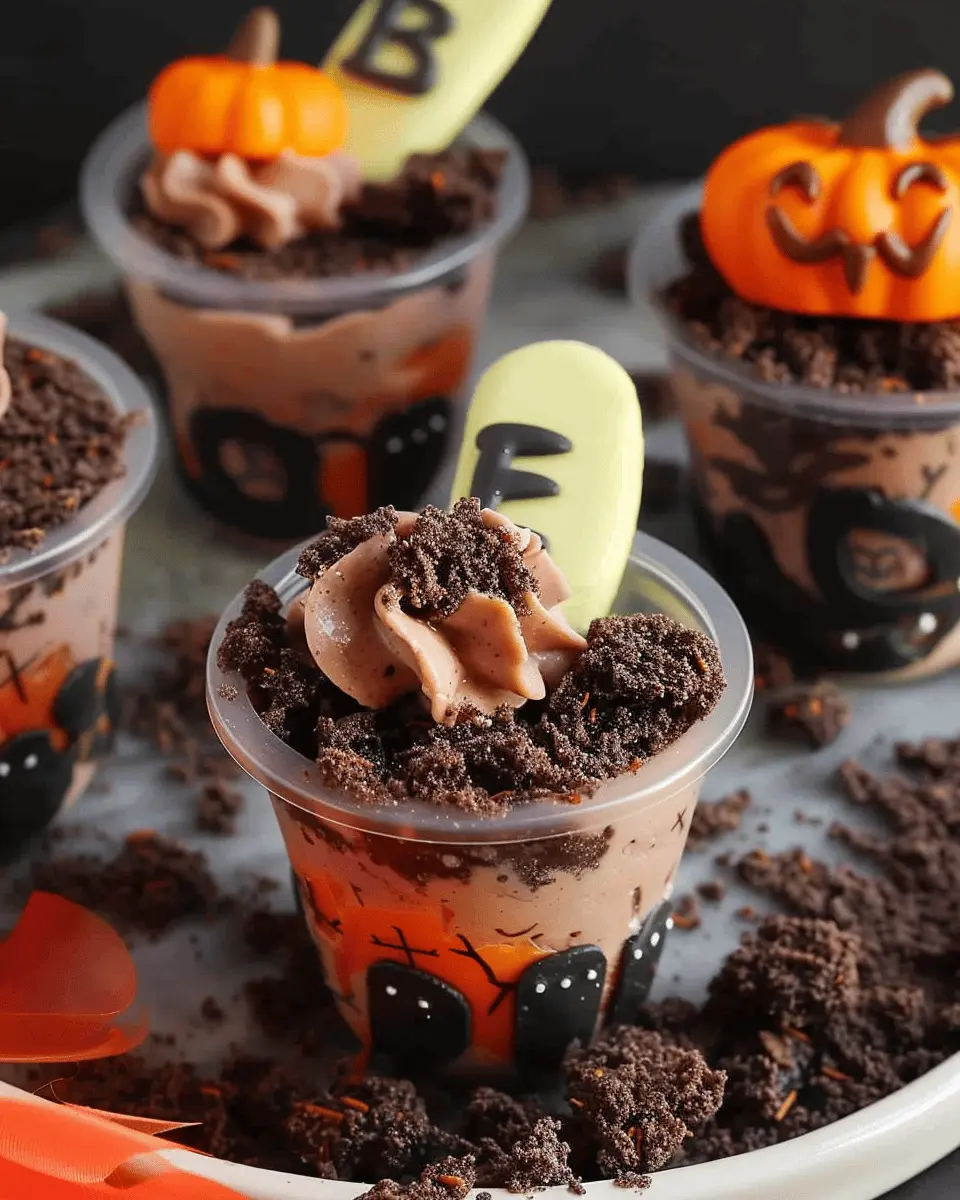
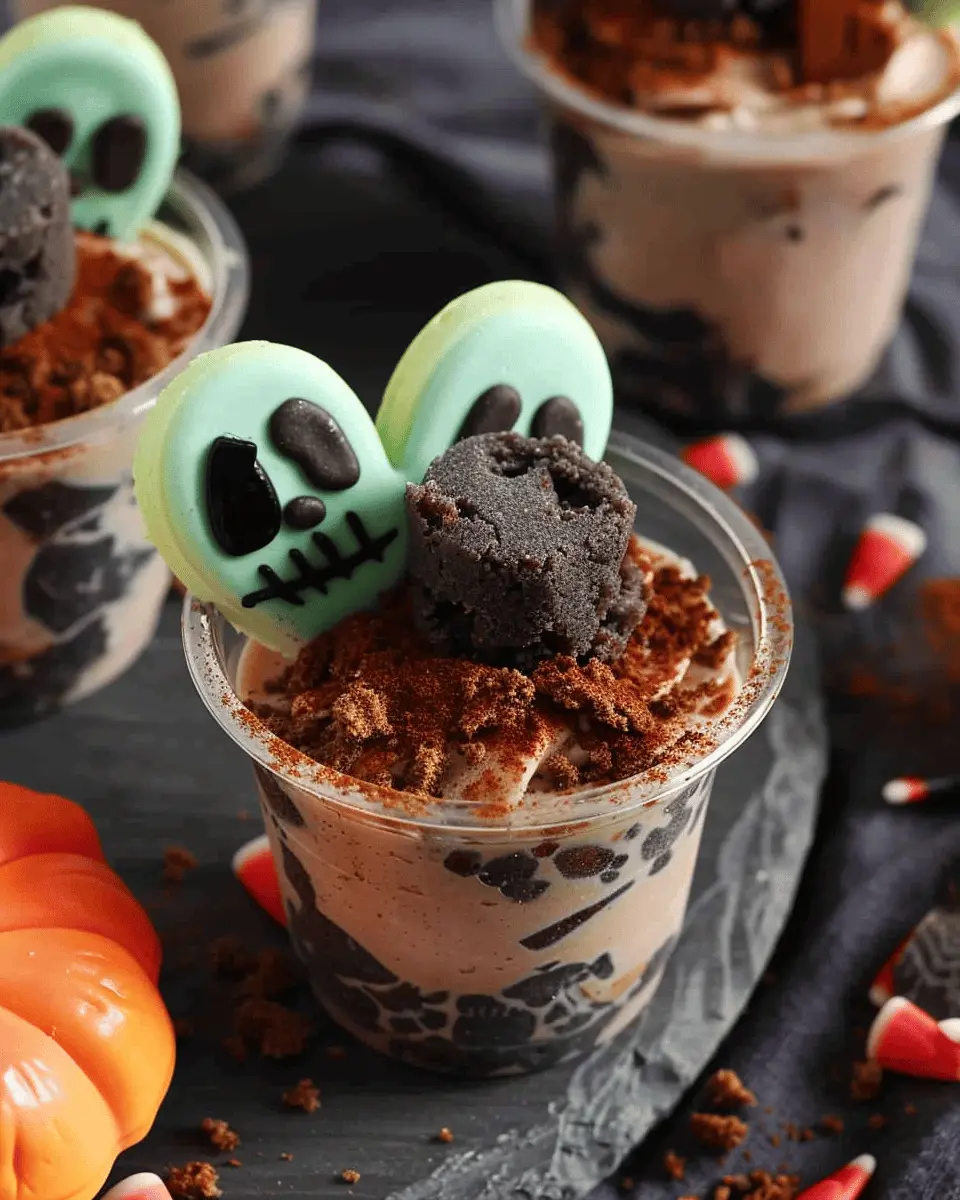
Visually Engaging: The sight of chocolate pudding layered with crushed cookies representing soil, adorned with gummy worms and edible gravestones, is enough to thrill any Halloween enthusiast. The presentation becomes part of the fun, sparking conversations and delight among guests.
-
Versatile for Any Gathering: Be it a casual Halloween get-together or a more formal dinner, these pudding cups fit right in. You can prepare them ahead of time and simply unveil them at the right moment, making them a convenient option for the busy host.
Considering all these aspects, it’s clear why Graveyard Pudding Cups are a favorite during the spooky season. They embody the spirit of Halloween while offering a delightful treat that can be adapted to everyone’s taste. Plus, there’s nothing quite like a dessert that brings a smile and a giggle from both kids and adults alike!
For more inspiration on festive treats, check out Good Housekeeping’s Halloween Desserts.
Ingredients for Graveyard Pudding Cups
Essential ingredients for a spook-tacular dessert
Creating your Graveyard Pudding Cups Halloween masterpiece starts with a handful of essential ingredients. Here’s what you’ll need to whip up this delightfully eerie dessert:
- Chocolate pudding mix: Rich and creamy, this is the base of your spooky cups.
- Milk: To blend with your pudding mix for that silky texture.
- Crushed chocolate cookies: These will mimic the look of dirt—perfect for a graveyard vibe.
- Gummy worms: Creepily delicious, they add to the spooky feel of your dessert.
- Plastic grave markers: These are optional but really enhance the graveyard scene!
For tips on where to find the best chocolate pudding recipes, consider checking out resources like King Arthur Baking for inspiration.
Optional ingredients for customization
Feeling adventurous? Customize your Graveyard Pudding Cups Halloween with these optional additions:
- Whipped cream: For a frothy topping that looks like ghostly clouds.
- Candy bones or spiders: Spooky decorations that could delight both kids and adults.
- Colorful sprinkles: Add some fun flair with seasonal or Halloween-themed sprinkles!
Feel free to adapt your pudding cups to match your taste preferences or dietary needs. Whether you keep it simple or get playful with add-ins, these Graveyard Pudding Cups are bound to impress at your next Halloween gathering!
Preparing Graveyard Pudding Cups Halloween
When Halloween rolls around, the creativity shines, and nothing embodies spooky fun more than Graveyard Pudding Cups Halloween. This delightful dessert is creatively simple, making it perfect for gatherings, parties, or a festive night in. So roll up your sleeves and let’s prepare these spooky treats together!
Gather your spooky supplies
Before diving into the culinary magic, ensure you have all the materials at hand. Here’s what you’ll need:
- Chocolate pudding mix
- Milk (dairy or plant-based, depending on preference)
- Crushed Oreos or chocolate cookies (for the “dirt”)
- Gummy worms (these are essential for the creep factor)
- Fake tombstones or cookie tombstones (made from graham crackers)
- Clear plastic cups
- Whipped cream (optional, for a cloud-like effect)
Having everything gathered not only makes the process smoother but also adds to the anticipation of your spooky creation. If you’re unsure where to find them, local grocery stores or online places like Amazon can be great resources for Halloween-themed supplies.
Make the pudding base
Now that you have your supplies, it’s time to whip up that pudding base. It’s incredibly easy, and you’ll be amazed by how quickly it comes together:
-
Mix the pudding: In a large bowl, whisk together the chocolate pudding mix and the milk. Follow the instructions on the package, usually using about 2 cups of milk for a standard-sized box.
-
Set the pudding: Let the mixture sit for about 5 minutes until it thickens — this is where the magic begins!
-
Taste test: If you’re feeling adventurous, add a spoonful of peanut butter or a hint of vanilla extract for an interesting twist.
The pudding base forms the crucial foundation of your Graveyard Pudding Cups Halloween. You can even make this step a day ahead and let it chill overnight.
Assemble the cups
With your pudding ready, it’s time to bring those cups to life! Grab your clear plastic cups — they’re perfect for showcasing your decorative layers.
-
Layer the pudding: Start by spooning the chocolate pudding into each cup, filling them about halfway.
-
Add the “dirt”: Sprinkle a generous layer of crushed Oreos or chocolate cookies on top. This not only looks like dirt but tastes delicious too!
-
Repeat layering: If you have enough pudding, feel free to create another layer of pudding followed by more crushed cookies. The more layers, the spookier (and tastier) it gets!
Create your graveyard scene
This is where your creativity can really shine. Your Graveyard Pudding Cups Halloween are not just a dessert; they’re a canvas!
-
Add gummy worms: Place a few gummy worms on top of the “dirt.” You can have them wriggling out of the pudding for an extra fright!
-
Decorate with tombstones: Stand up your cookie tombstones or use store-bought options to give it that graveyard feel. For an extra touch, write spooky names or messages with icing.
-
Use whipped cream: If you opted for it, a dollop of whipped cream on top gives a ghostly touch.
Chill and present your spooky dessert
Once your cups are assembled, cover them with plastic wrap and pop them in the fridge for at least an hour. This allows the flavors to meld and the pudding to firm up.
When you’re ready to present them at your gathering or to the family, take a moment to enjoy the delight in their eyes. You’ll see a mix of intrigue and excitement — and isn’t that the point of Halloween? Serve your Graveyard Pudding Cups Halloween chilled and enjoy the compliments!
For more inspiration and creative twists on this idea, you can check out Food Network for additional Halloween-themed recipes. Enjoy your spooky culinary adventure!

Variations on Graveyard Pudding Cups
When it comes to celebrating the spooky season, finding ways to make your Graveyard Pudding Cups Halloween treat inclusive and fun can elevate your gathering. Let’s dive into some exciting variations that cater to all dietary preferences.
Gluten-Free Options
Creating Graveyard Pudding Cups without gluten is easier than you might think! Use gluten-free cookies like almond flour or gluten-free graham crackers for the “dirt” layer. Be sure to check that your pudding mix is gluten-free as well; many brands offer delicious options. Using fresh fruit can add a delightful twist—try layering in some mashed banana for extra flavor and nutrition!
Vegan Adaptations
For a plant-based version, swap out traditional pudding mixes for almond milk or coconut milk-based options. You can often find vegan-friendly pudding mixes or make your own using cornstarch, cocoa powder, and plant milk. Top with crushed vegan cookies and let’s not forget those spooky gummy worms—many brands are now vegan, too! It’s a fantastic way to ensure everyone can enjoy this festive treat.
Creative Topping Ideas
The best part of Graveyard Pudding Cups Halloween is their versatility. Get creative with toppings:
- Edible soil: Use crushed cookies mixed with cocoa powder for that authentic dirt look.
- Creepy critters: Add gummy spiders or bees for that extra fright.
- Decorative cookies: Use pumpkin-shaped or ghost cookies for fun accents on top.
- Whipped cream: Add a dollop for a ghostly touch!
By incorporating these variations, you can create a Graveyard Pudding Cup that not only looks haunted but also caters to everyone’s needs. Wouldn’t your friends be thrilled to dig into a dessert that suits their dietary preferences? Explore your creative side and enjoy the festive fun! For more ideas on inclusive Halloween treats, check out Healthline’s recipe section.
Cooking Tips and Notes for Graveyard Pudding Cups Halloween
Making Ahead for Convenience
Graveyard Pudding Cups Halloween are perfect for prepping in advance. You can make the pudding and layer the ingredients a day or two before your spooky gathering. Just store them covered in the refrigerator. This not only saves time on the day of your event but also allows the flavors to meld together beautifully. Additionally, consider using these storage containers for easy packing and transport.
Tips for the Perfect Texture
Achieving the ideal pudding texture is essential. To prevent lumps, whisk the pudding mixture vigorously while incorporating milk. Let it chill for a bit in the fridge before layering; this will help it set and enhance the overall experience. For an extra creamy texture, you can fold in some cool whipped topping before layering—trust me, it makes a difference!
Keeping Things Tidy During Assembly
Assembly can get a little messy, but a few simple tricks can keep your workspace tidy. Utilize a piping bag for the pudding; this not only looks professional but limits spills. Consider placing your crushed cookies in a zip-top bag and using a rolling pin to crush them—less mess and easy clean-up. Remember to keep your workspace organized with all ingredients at hand to streamline the process!
By following these tips, you’ll have more time to enjoy the festivities and impress your friends with deliciously spooky treats. Happy Halloween!

Serving Suggestions for Graveyard Pudding Cups
Creative Presentation for Halloween Gatherings
When it’s time to unveil your Graveyard Pudding Cups Halloween, presentation is key! Consider serving them in small terracotta pots for that extra rustic touch. Layer crushed chocolate cookies on top to mimic dirt, and place gummy worms crawling over the edges—because who can resist a little creepiness? Add a mini plastic skeleton or a tiny tombstone decoration for an unexpected fright to the delight of your guests! For a cohesive look, display them on a festive tablecloth adorned with cobwebs or choose dark, moody tones that scream Halloween.
Pairing Ideas with Other Spooky Treats
Looking to create a fun dessert table? Your Graveyard Pudding Cups would pair wonderfully with other Halloween-themed treats. Think about adding ghost-shaped meringues or pumpkin-flavored cupcakes for variety. For a savory twist, offer mini sliders made with turkey bacon or chicken ham, balancing the sweetness of the desserts. Serve everything with a spooky non-alcoholic punch, like a “Witch’s Brew” made from green lemonade and floating eyeball ice cubes made from peeled grapes. Check out this Halloween treat recipe for more ideas!
These simple yet effective serving suggestions will elevate your Graveyard Pudding Cups into a memorable centerpiece for your Halloween festivities!
Time Breakdown for Graveyard Pudding Cups
Creating your Graveyard Pudding Cups Halloween treat is a fun and easy way to celebrate the spooky season! Here’s a handy time breakdown:
Preparation time
You’ll want to set aside about 15 minutes for preparation. This involves gathering your ingredients, mixing the pudding, and prepping any decorations like cookie crumbs or gummy worms.
Assembly time
Assembling your cups will take another 15-20 minutes. Layer your pudding, cookie crumbs, and candies in clear cups, and don’t forget to create that eerie graveyard scene with gravestones and ghostly treats!
Total time
In total, you’re looking at about 30-35 minutes to whip up these delightfully creepy dessert cups. With such a short time investment, you’ll have plenty more to enjoy the Halloween festivities!
For more tips on creating fun Halloween treats, check out Food Network’s Halloween Recipes.
Nutritional Facts for Graveyard Pudding Cups
Calories
When crafting your Graveyard Pudding Cups Halloween, it’s essential to be mindful of the calories. Each cup typically contains around 200-300 calories, depending on your ingredients and portion sizes. While this treat is certainly indulgent, it can fit into your seasonal celebrations without guilt.
Sugar Content
These delightful cups can also pack a sugary punch, with about 25 grams of sugar per serving. The sweetness mainly comes from the pudding and any toppings like crushed cookies and gummy candies. If you’re planning to serve them at a gathering, be prepared for the sugar rush!
Alternatives for Healthier Choices
For those wanting to create a healthier version of the Graveyard Pudding Cups Halloween, consider these simple swaps:
- Use sugar-free pudding: This can significantly cut down on sugar content.
- Opt for Greek yogurt: Mixing Greek yogurt with a little vanilla can provide protein while still giving that creamy texture.
- Garnish with fruit: Fresh berries or banana slices instead of candy can add natural sweetness.
By incorporating these alternatives, you can create a version that brings smiles without the post-dessert sugar crash. For more tips on healthy ingredient substitutions, check out Nutrition.gov.
With just a few mindful tweaks, you can enjoy your spooky delights while keeping your health in check!
FAQs about Graveyard Pudding Cups
Can I make these pudding cups in advance?
Absolutely! Making Graveyard Pudding Cups Halloween in advance is a great way to save time on the big day. You can prepare the pudding a day or two ahead and assemble them in cups when you’re ready. Just layer the pudding, crumbled cookies, and decorations, and store them in the fridge. They’ll stay fresh, allowing the flavors to mingle while you focus on enjoying the festivities!
What can I use instead of traditional pudding?
If traditional pudding isn’t your thing, don’t worry—there are plenty of alternatives! Consider using:
- Greek yogurt for a healthier twist. Mix with a bit of cocoa powder and sweetener for a dessert-like flavor.
- Dairy-free pudding options, like coconut or almond pudding, if you’re lactose intolerant.
- Custard for a creamier texture that still delivers on taste.
Feel free to get creative! You can also incorporate different flavors, such as vanilla or caramel, to mix up the experience.
How do I store leftover pudding cups?
If you’ll have leftovers, it’s crucial to store them properly. Simply cover the cups with plastic wrap or transfer the pudding to airtight containers. Make sure to consume them within 2-3 days for the best quality. The longer they sit, the softer the cookie layers may become. But hey, a little sogginess isn’t always a bad thing—it can create an extra gooey treat.
For ultimate success this Halloween, keep an eye on these tips and enjoy your spooky creations! If you’re looking for more Halloween fun, check out Taste of Home for other festive recipes and ideas.
Conclusion on Graveyard Pudding Cups for Halloween
Embrace the spooky spirit with these fun and easy treats! Graveyard Pudding Cups Halloween are not just delightful to the eyes; they’re also a perfect way to connect with friends and family while getting into the festive mood. With minimal prep and creativity, you can craft these whimsical cups that appeal to all ages.
Imagine the joy on your guests’ faces as they dig into layers of rich pudding and crushed cookies, topped with gummy worms and decorative gravestones. Whether you’re throwing a Halloween party or just enjoying the season, these treats are sure to be a hit. Dive into this delicious activity and create memories that will last longer than your dessert!
For more fun Halloween ideas, check out resources like The Spruce or Taste of Home!
PrintGraveyard Pudding Cups Halloween: Easy & Fun Recipe for All Ages

Create these spooky Graveyard Pudding Cups for Halloween that are easy and fun for everyone!
- Prep Time: 15 minutes
- Cook Time: 0 minutes
- Total Time: 15 minutes
- Yield: 12 servings 1x
- Category: Dessert
- Method: No bake
- Cuisine: American
- Diet: Vegetarian
Ingredients
- 2 cups chocolate pudding
- 1 package crushed Oreos
- 12 gummy worms
- 1 package of Halloween-themed candy decorations
- 1 package of clear plastic cups
Instructions
- Prepare the chocolate pudding according to the package instructions.
- In clear plastic cups, layer chocolate pudding and crushed Oreos.
- Add gummy worms on top for a fun effect.
- Decorate with Halloween candy to make it spooky.
- Chill in the refrigerator before serving.
Notes
- Feel free to customize with your favorite toppings.
- These cups can be prepared in advance for parties.
Nutrition
- Serving Size: 1 cup
- Calories: 200
- Sugar: 18g
- Sodium: 140mg
- Fat: 8g
- Saturated Fat: 3g
- Unsaturated Fat: 4g
- Trans Fat: 0g
- Carbohydrates: 30g
- Fiber: 1g
- Protein: 3g
- Cholesterol: 5mg
Keywords: Graveyard Pudding, Halloween Treats, Easy Desserts