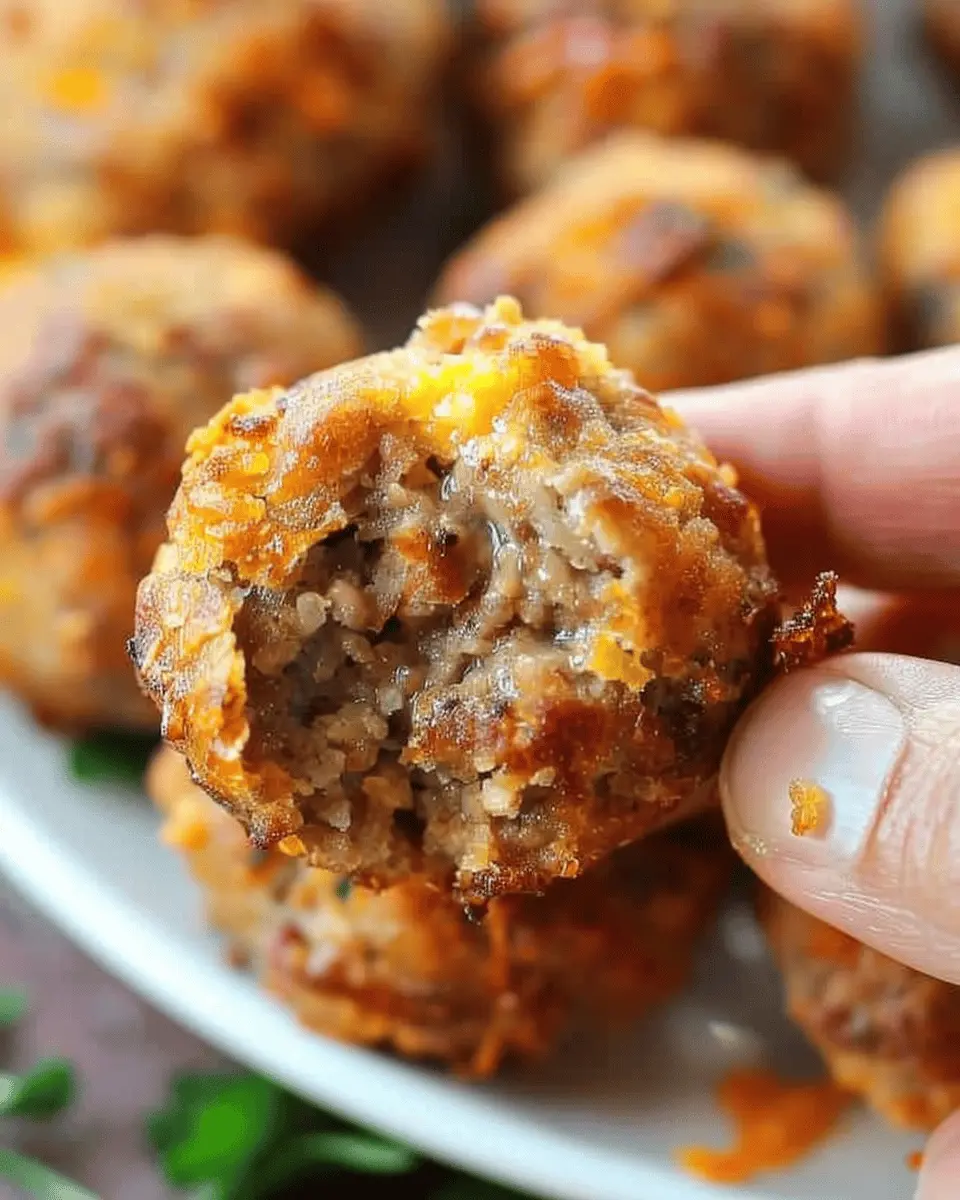
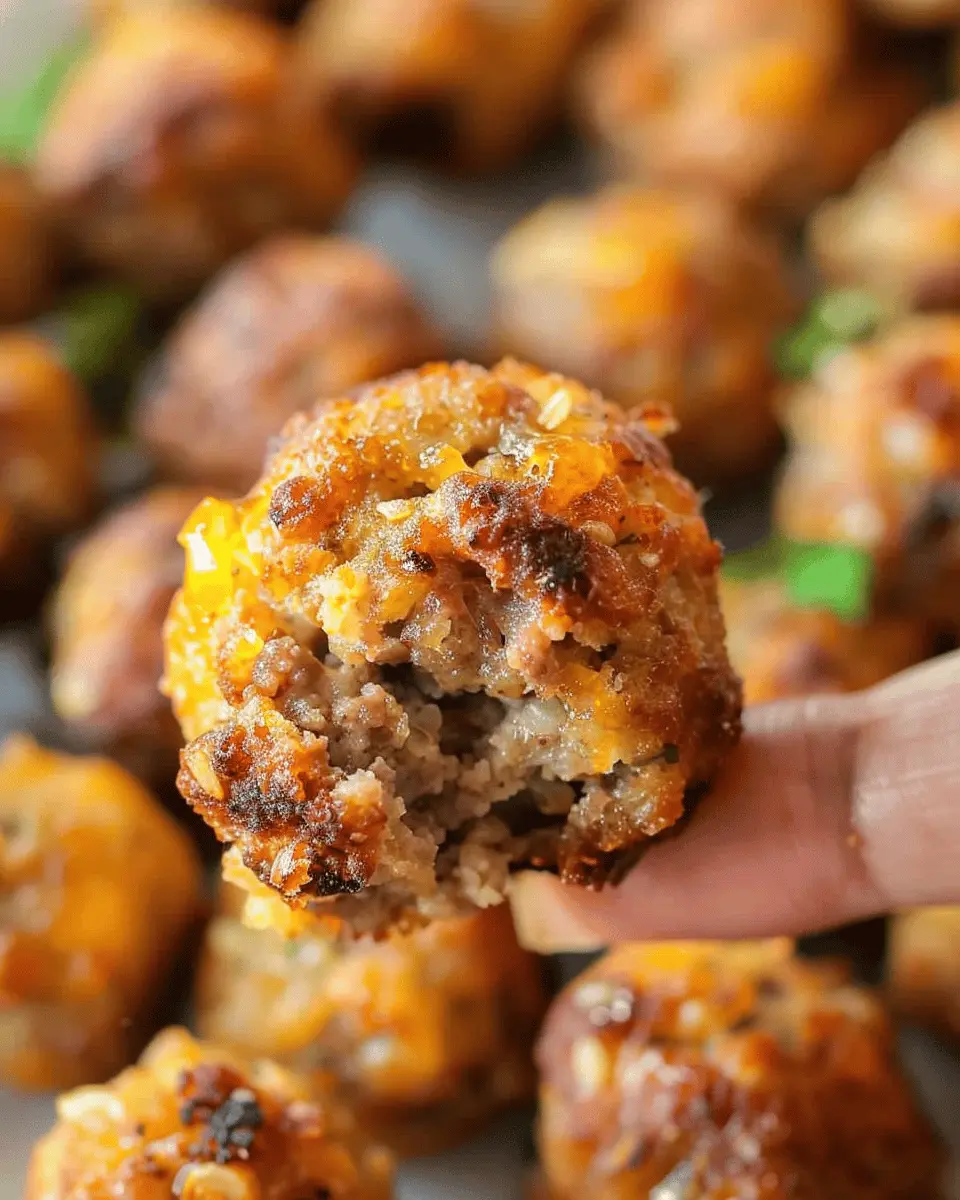
Outline for Bisquick Sausage Balls
When it comes to whipping up a snack that’s as versatile as it is delicious, Bisquick sausage balls take center stage. Whether you’re prepping for a game day gathering, a festive holiday brunch, or simply indulging in a cozy night in, these savory bites are perfect for any occasion. This outline will guide you through every aspect of making these tasty treats, from gathering your ingredients to perfecting your baking technique.
Why Choose Bisquick for Your Sausage Balls?
Using Bisquick as the base for your sausage balls not only delivers convenience but also ensures a delightful texture that’s fluffy on the inside and crunchy on the outside. You’re probably familiar with Bisquick’s versatile nature—let’s face it, it can shine in pancakes, waffles, and even biscuits. By using this trusted mix, you’ll save time on measuring and mixing, freeing you up to enjoy those mouthwatering little bites.
The Benefits of Turkey Bacon and Chicken Ham
If you’ve ever pondered how to make those beloved sausage balls a tad healthier without sacrificing flavor, here’s your answer: swap the traditional pork sausage for turkey bacon and chicken ham. Not only do these ingredients lower the fat content, but they also bring unique flavors that elevate your dish. With chicken and turkey packing a punch in the protein department, it’s a win-win!
Gathering Your Ingredients
To create the best Bisquick sausage balls, you’ll need to gather a few key ingredients that are likely already in your pantry. Here’s what you’ll need:
- 1 lb ground turkey bacon
- 1 cup Bisquick mix
- 1 cup shredded cheddar cheese
- 1/2 cup milk
- 1 tsp garlic powder
- 1 tsp onion powder
- 1/2 tsp black pepper
- Optional: Fresh herbs, like chopped parsley or chives for garnish
These simple ingredients combine in delicious harmony, leading to a snack that’s rich in flavor and easy to make.
Preparing Your Bisquick Sausage Balls
Here’s the fun part—prepping your sausage balls is quicker than you might think! Follow these steps for best results:
-
Preheat your oven: Set it to 375°F (190°C).
-
Mix the Ingredients: In a bowl, combine your ground turkey bacon, Bisquick, cheddar cheese, milk, garlic powder, onion powder, and black pepper. Using your hands works best for blending! You want everything well incorporated but be careful not to overmix.
-
Shape the Balls: Using a small ice cream scoop or your hands, create tablespoon-sized balls and place them on a baking sheet lined with parchment paper.
-
Bake to Perfection: Slide your baking sheet into the oven and let those beauties bake for about 15–20 minutes, or until they’re golden brown and cooked through.
Experimenting with Your Recipe
One of the great things about making Bisquick sausage balls is how easily they adapt to personal tastes and dietary needs. Want to add a little kick? Consider tossing in some chopped jalapeños or your favorite hot sauce into the mix. Want to up the flavor? Incorporate some fresh herbs or different types of cheese.
Serving Suggestions
Once out of the oven, the next delightful challenge is deciding how to serve your Bisquick sausage balls. Here are some tasty ideas:
-
Dipping Sauces: Offer a variety of dipping sauces, like honey mustard, barbecue sauce, or even a spicy ranch dressing to complement the flavors.
-
On a Charcuterie Board: These little bites work beautifully on a charcuterie board, paired with fruits, nuts, and artisan crackers.
-
Breakfast Buffet Style: Incorporate them into an easy breakfast buffet along with scrambled eggs and fresh fruit for brunch gatherings.
Storing and Reheating
Now that you’ve mastered the creation of Bisquick sausage balls, what happens to the leftovers? If you somehow find yourself with any, here’s how to store and reheat them properly:
-
Storing: Place them in an airtight container in the refrigerator for up to 3 days. If you want to keep them longer, pop them in the freezer where they can last for a month or more.
-
Reheating: For the best results, heat them in the oven at 350°F for about 10 minutes. This ensures they stay crispy instead of soggy.
Quick Tips for Perfect Bisquick Sausage Balls
Here’s a handy checklist to keep in mind while you create your Bisquick sausage balls:
-
Don’t Overmix: Overworking your dough can lead to tough balls. Mix just until combined for the best texture.
-
Experiment with Cheeses: Trying different types of cheese can lead to surprisingly good results. Go for pepper jack for extra heat or a smoked cheddar for a unique flavor profile.
-
Mind the Baking Time: Keep an eye on your sausage balls as ovens can vary. Start checking around the 15-minute mark to avoid over-baking.
Conclusion: The Joy of Making Bisquick Sausage Balls
So there you have it! A detailed guide on how to create scrumptious Bisquick sausage balls that serve as an ideal snack or meal centerpiece. Not only are they effortless to prepare, but they also cater to a range of tastes and preferences thanks to the versatility of your ingredients. As you embark on your cooking journey, remember that every tweak and adjustment you make is part of creating a dish that reflects your personal flavor.
Feel free to share your adaptations and unique serving suggestions in the comments below – I’d love to hear what you come up with! Enjoy these delightful bites at your next gathering and revel in the joy they bring to the occasion. Happy cooking!
Introduction to Bisquick Sausage Balls
The nostalgia of comfort food
There’s something incredibly soothing about comfort food, isn’t there? It often takes us back to simpler times—piercing through the daily grind with a rush of warmth. For many, Bisquick sausage balls embody this sense of nostalgia. Imagine those cozy family gatherings, where delicious aromas wafted from the kitchen, inviting everyone to the table. That’s the kind of heartwarming memory these delightful bites can summon, making them a perfect choice for both intimate gatherings and casual snacking.
Why homemade is better than fast food
Let’s face it: while grabbing fast food might seem convenient, it often lacks the personal touch and wholesome quality that homemade food provides. With just a few straightforward ingredients, you can whip up a batch of Bisquick sausage balls in no time. This homemade option allows you to choose your own spices, meats, and even swap in healthier alternatives like turkey bacon or chicken ham. Not to mention, you know exactly what goes into them, eliminating hidden additives and preservatives often found in fast food. According to the USDA, home-cooked meals are typically lower in calories and higher in nutritional value—what’s not to love?
Overview of Bisquick sausage balls as a delightful snack
So, what exactly are Bisquick sausage balls? Imagine savory bites, perfectly seasoned and combining the delicious flavors of beef or turkey bacon with the fluffiness of Bisquick mix. These little wonders are not just for breakfast; they make an excellent snack, appetizer, or even a party staple. They can be whipped up quickly, making them ideal for spontaneous gatherings or for when guests pop by unexpectedly.
Plus, they are versatile! You can customize your batch with different spices, cheeses, or even herbs to suit everyone’s taste buds. This makes Bisquick sausage balls not only a delightful treat but also a great canvas for culinary creativity.
For trusted kitchen tips and tricks, check out Cooking Light’s guide on quick bites. Let’s dive into the recipe and bring these nostalgic snacks to life!
Ingredients for Bisquick Sausage Balls
The Essentials
For those easy yet scrumptious Bisquick sausage balls, you’ll need a few fundamental ingredients:
- 1 pound of ground beef (or your choice of meat)
- 2 cups of Bisquick mix
- 1 cup of shredded cheese (cheddar works wonderfully!)
- ½ cup of milk
- 1 teaspoon of garlic powder
- 1 teaspoon of onion powder
These ingredients come together to create a savory, satisfying bite that’s perfect for gatherings or as a quick snack.
Optional Gluten-Free Variations
Looking for a gluten-free option? No problem! Simply swap out the regular Bisquick with a gluten-free baking mix. Many brands offer excellent alternatives that maintain the same delicious results. You can check out the selection at King Arthur Baking for some trusted choices.
Substitutions for Flavor Enhancement
Want to amp up the flavor of your Bisquick sausage balls? Here are simple substitutions you can try:
- Substitute turkey bacon or chicken ham for a lighter option.
- Mix in herbs like parsley or chives for an extra flavor kick.
- For a spicy twist, consider adding jalapeños or hot sauce to the mix.
Experiment with these ingredients to create your own unique version of this beloved recipe!
Preparing Bisquick Sausage Balls
Nothing says comfort food quite like Bisquick sausage balls. These delightful bites are perfect for any occasion—be it a casual gathering, game day, or just a cozy night in. If you’re ready to whip up a batch of these cheesy, savory treats, let’s dive into the preparation process.
Gather Your Ingredients
Before diving into the fun part—mixing and baking—let’s make sure you have all your ingredients ready. This not only saves time but ensures a smooth cooking experience. For this recipe, you’ll need:
- 1 pound of beef sausage (mild or spicy, depending on your preference)
- 2 cups of Bisquick mix
- 2 cups of shredded cheddar cheese
- 1/2 cup of milk
- 1/2 teaspoon of garlic powder (optional, but recommended for an extra kick)
- A pinch of black pepper
You’ll find that most of these ingredients are pantry staples. If you’re curious about the versatility of Bisquick mix, check out resources from King Arthur Baking or Bob’s Red Mill for additional cooking tips.
Preheat Your Oven
Now that you have everything ready and laid out, it’s time to get the oven going. Preheat your oven to 350°F (175°C). Preheating is crucial; it ensures your sausage balls bake evenly and achieve that golden-brown exterior that makes them so irresistible.
Mixing the Sausage and Cheese
In a large mixing bowl, combine the beef sausage and shredded cheddar cheese. Using your hands (make sure they’re clean!), work the ingredients together until they are thoroughly mixed. If you’re not a fan of getting your hands messy, a sturdy spatula can work as well.
Next, add in the Bisquick mix, garlic powder, and black pepper. Slowly pour in the milk while mixing to create a cohesive dough. You want the mixture to be firm yet pliable, which makes forming the balls much easier. Take a moment to really mix everything well; a consistent batter will lead to flavorful bites.
Forming the Sausage Balls
Once your mixture is well combined, it’s time to form your sausage balls. For uniform size, I recommend using a small cookie scoop or your hands to roll them into balls about 1 inch in diameter. Place the balls on an ungreased baking sheet, spacing them a couple of inches apart to allow for any puffing they might do in the oven. It’s okay if they aren’t perfect; remember, the heart of homemade cooking lies in its imperfections!
Baking to Perfection
Your oven should be nicely heated by now. Slide the baking sheet into the oven and set a timer for 20-25 minutes. Keep an eye on them; you know they’re done when they turn golden brown and you can smell that delightful aroma wafting through your home.
Once they’re done, don’t forget to let the Bisquick sausage balls cool on the baking sheet for a few minutes before transferring them to a serving plate. This will help them firm up a bit more, making them the perfect bite-sized treats to share (or keep for yourself).
Final Thoughts
These Bisquick sausage balls are incredibly versatile; they can be served with a variety of dipping sauces like barbecue sauce or ranch dressing. Whether you’re hosting a party or just making a quick snack, this recipe is sure to impress.
So, ready to impress your friends or simply enjoy a delicious homemade treat? Grab your ingredients and get cooking! You won’t regret it.
Variations on Bisquick Sausage Balls
When it comes to Bisquick sausage balls, the classic recipe is just the beginning. Let’s dive into some exciting variations that will cater to different tastes and dietary preferences, making your next gathering or snack time even more enjoyable!
Turkey Bacon or Chicken Ham Options
For those looking to lighten things up, consider swapping traditional sausage for Turkey bacon or Chicken ham. Both alternatives provide a flavorful kick while significantly reducing fat content. Simply chop your choice into small pieces and mix it in with the Bisquick dough. Trust me, you won’t miss the extra calories!
Spicy Alternatives with Jalapeños
If you enjoy a bit of heat, elevating your Bisquick sausage balls with jalapeños is a game changer. Diced fresh jalapeños or even pickled ones can bring a delightful zing. For an extra kick, you could also sprinkle in some cayenne pepper or hot sauce. Just remember to adjust the amounts to your heat tolerance – it’s easy to dial it up, but you can’t take it back!
Cheese Lover’s Twist
Who can resist cheese? Adding your favorite shredded cheese, like cheddar or pepper jack, will make your Bisquick sausage balls ooey-gooey and irresistible. Mix in a cup of cheese directly into the dough for that melty goodness. For an added treat, try wrapping some cheese cubes in the dough before baking for cheesy bites that ooze deliciousness.
With these variations, you can cater to any crowd while keeping things fresh and exciting. Don’t forget to serve them alongside your favorite dipping sauce or even a ranch-style yogurt for an added layer of flavor. Happy cooking!

Cooking Tips and Notes for Bisquick Sausage Balls
Ensure even size for uniform cooking
When making Bisquick sausage balls, one of the key secrets to success is achieving a uniform size. Each ball should be roughly the same size, around one inch in diameter. This ensures they bake evenly, giving you that delightful golden-brown finish on every piece. Use a cookie scoop or your hands to measure, and trust us—your taste buds will thank you!
Adjusting baking time for larger balls
If you prefer larger Bisquick sausage balls, be prepared to adjust your baking time. While the standard baking time is approximately 20 minutes, larger balls may need an extra 5 to 10 minutes to cook through properly. Keep an eye on them; they should be firm to the touch and golden on the outside. Remember, undercooked balls can lead to a gooey center, which is not the texture you want.
Storing leftovers for future snacks
Got leftovers? Lucky you! Store any uneaten Bisquick sausage balls in an airtight container in the fridge for up to three days. They also freeze incredibly well. Just pop them in freezer bags, and they can last for up to a month! When you’re ready to enjoy them again, simply reheat in the oven at 350°F until warmed through—a perfect snack for busy days. For more storage tips, check out Food Safety.
Serving Suggestions for Bisquick Sausage Balls
Perfect Pairings with Dipping Sauces
When it comes to enjoying Bisquick sausage balls, the right dipping sauce can elevate your experience to a whole new level. Consider serving them with:
- Honey Mustard: The sweetness pairs perfectly with the savory flavors.
- Ranch Dressing: A classic choice for its creamy texture and mild flavor.
- Spicy BBQ Sauce: For those who enjoy a kick, this adds a delightful contrast.
Feel free to experiment with different sauces—your unique twist could become a new favorite!
Serving as Appetizers at Gatherings
Bisquick sausage balls are fantastic conversation starters at any gathering. Whether it’s a casual game night or a lively holiday party, these bite-sized treats are sure to impress. Present them on a platter with colorful toothpicks for an eye-catching display. If you want to make them extra special, label the sauces to help guests mix and match as they please.
Incorporating into Meal Prep
Looking for a quick snack or a protein boost for your busy weekdays? Bisquick sausage balls are perfect for meal prep! They freeze well and can be easily reheated, making them an ideal snack for those who are always on the go. Just bake a big batch and store them in the freezer. When hunger strikes, pop a few in the microwave or oven for a deliciously satisfying treat.
With these suggestions, your Bisquick sausage balls will shine at every occasion! To discover more meal prep ideas, check out EatingWell for nutritious inspiration.
Time Breakdown for Making Bisquick Sausage Balls
Preparation Time
Making Bisquick sausage balls is a breeze! Start with about 10 minutes for preparation. This includes gathering your ingredients, measuring them out, and mixing everything together. It’s a perfect task for those busy weeknights when you want to whip up something hearty in no time!
Cooking Time
Once your mixture is ready, pop those delightful balls into the oven for approximately 20-25 minutes. You’ll want to aim for a golden-brown exterior that signals the deliciousness within.
Total Time
All in all, from start to finish, you’ll invest about 30-35 minutes for a batch of these scrumptious Bisquick sausage balls. Perfect for parties or a satisfying snack, they pack flavor and convenience into every bite.
For tips on ingredient variations or dipping sauces, check out Food Network for great ideas. Enjoy snacking!
Nutritional Facts for Bisquick Sausage Balls
When it comes to satisfying snacks, Bisquick sausage balls pack a punch both in flavor and nutrition. Here’s a quick breakdown:
Calories per serving
Each serving of these delightful bites contains approximately 100 calories. This makes them a great option for a quick snack or party appetizer without derailing your diet.
Protein content
You’ll find about 5 grams of protein per ball, thanks to the inclusion of sausage and cheese. This protein content not only keeps you full longer but also supports muscle repair and growth, making them perfect for a post-workout treat.
Important dietary information
These Bisquick sausage balls are versatile! You can use turkey bacon or chicken ham for lower-fat options. Additionally, they can be made gluten-free by swapping out the Bisquick for a gluten-free blend. For those counting carbs, consider adjusting the cheese content to fit your dietary needs. Always check labels on ingredients to ensure they meet your dietary restrictions.
For more health-focused recipes, you can explore Healthline for insights!
FAQs about Bisquick Sausage Balls
Can I make them ahead of time?
Absolutely! You can prepare your Bisquick sausage balls in advance. Mix everything together, roll them into balls, and then store them in the fridge for up to 24 hours before baking. This is perfect for busy mornings or last-minute gatherings. If you want to go even further, you can freeze the uncooked meatballs. Just pop them in a freezer bag and freeze for up to three months. When you’re ready to enjoy, bake them straight from the freezer, just adding a few extra minutes to the cooking time.
What are the best ways to store them?
Once baked, Bisquick sausage balls can be stored in an airtight container in the refrigerator for up to four days. To reheat, just pop them in the microwave for about 30 seconds or until warmed through. If you find yourself with leftovers that you can’t eat right away, consider freezing them. They can last up to three months in the freezer. For reheating from frozen, bake them in a preheated oven for about 15 minutes at 350°F. For detailed storage tips, check out this food storage guide.
Can I customize the flavors?
Definitely! One of the best things about Bisquick sausage balls is their versatility. You can easily customize the flavors by adding different cheeses, spices, or even using turkey bacon or chicken ham for a twist. Want a spicy kick? Add some chopped jalapeños or hot sauce. Prefer something milder? Try mixing in herbs like parsley or chives. The possibilities are endless, so don’t hesitate to experiment and make these tasty bites your own!
Conclusion on Bisquick Sausage Balls
Recap of Benefits
In summary, Bisquick sausage balls are a delightful blend of savory flavors, perfect for gatherings or a hearty snack. They’re incredibly easy to whip up, requiring just a handful of ingredients, and they can be customized to suit your taste preferences. Plus, they’re versatile—great for breakfast, brunch, or even an afternoon treat!
Encouragement to Try the Recipe
If you haven’t yet tried making Bisquick sausage balls, now is the perfect time! With their mouth-watering aroma and satisfying texture, they’re sure to impress friends and family alike. Don’t hesitate—grab your ingredients and give this simple recipe a try!
Invitation to Share Experiences and Variations
We’d love to hear how your Bisquick sausage balls turn out! Share your personal spin on the recipe, whether you added spices or different types of meat like turkey bacon or chicken ham. Your creativity can inspire others, so join the conversation and let’s celebrate the joy of cooking together. For more cooking tips and inspiration, check out resources like Food Network and Bon Appétit.
PrintBisquick sausage balls with turkey bacon: Easy, crowd-pleasing bites

These Bisquick sausage balls made with turkey bacon are simple to prepare and perfect for any gathering!
- Prep Time: 15 minutes
- Cook Time: 25 minutes
- Total Time: 40 minutes
- Yield: 30 servings 1x
- Category: Appetizer
- Method: Baking
- Cuisine: American
- Diet: Gluten-Free
Ingredients
- 1 pound turkey bacon
- 2 cups Bisquick baking mix
- 1 cup shredded cheddar cheese
- 1/2 cup milk
- 1 teaspoon garlic powder
Instructions
- Preheat the oven to 350°F (175°C).
- In a large bowl, mix together turkey bacon, Bisquick, cheese, milk, and garlic powder until well combined.
- Shape the mixture into small balls and place them on a baking sheet.
- Bake for 20-25 minutes or until golden brown.
- Serve warm and enjoy!
Notes
- Feel free to add spices according to your taste.
- These can be made ahead of time and frozen for later use.
Nutrition
- Serving Size: 2 balls
- Calories: 150
- Sugar: 1g
- Sodium: 300mg
- Fat: 10g
- Saturated Fat: 4g
- Unsaturated Fat: 5g
- Trans Fat: 0g
- Carbohydrates: 10g
- Fiber: 0g
- Protein: 6g
- Cholesterol: 30mg
Keywords: Bisquick Sausage Balls