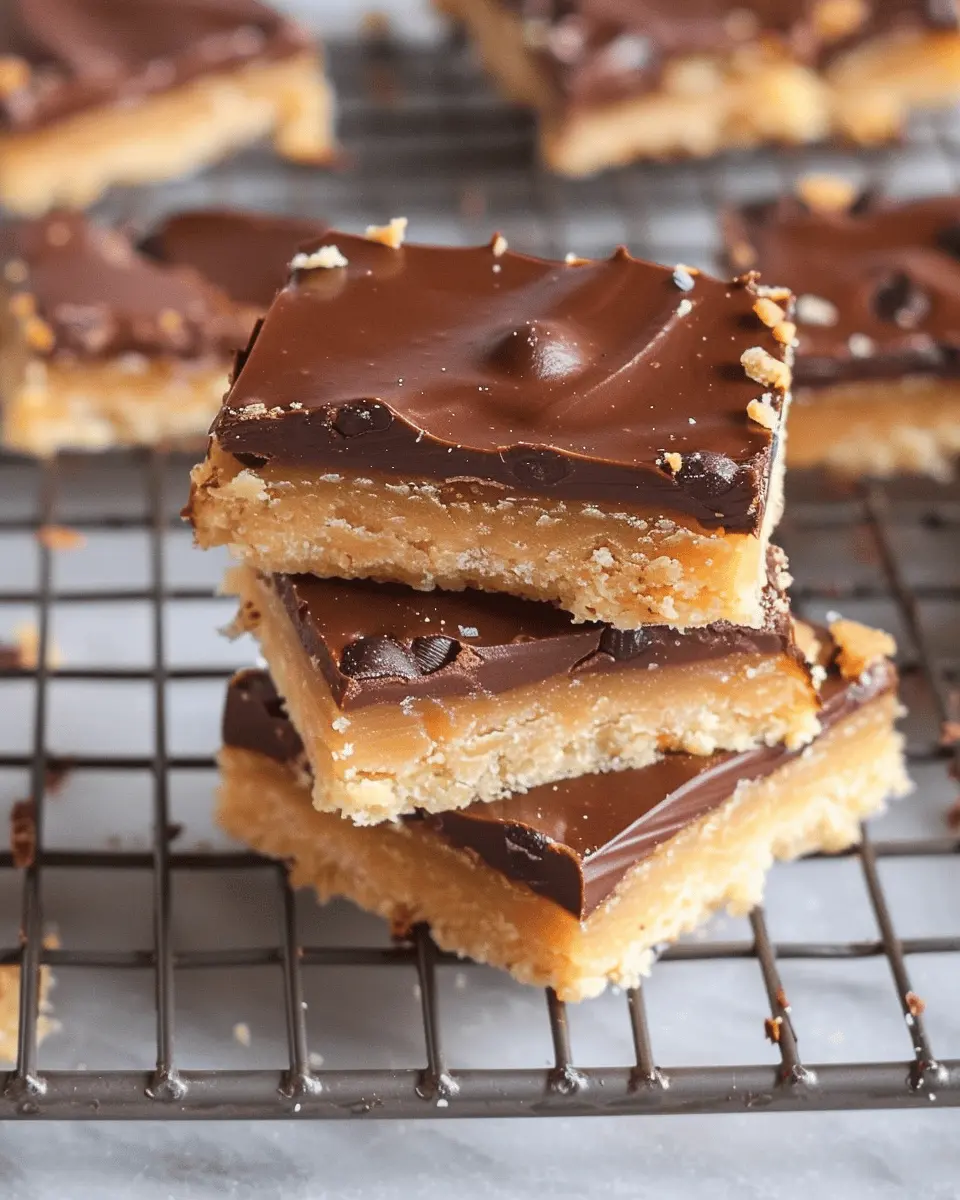
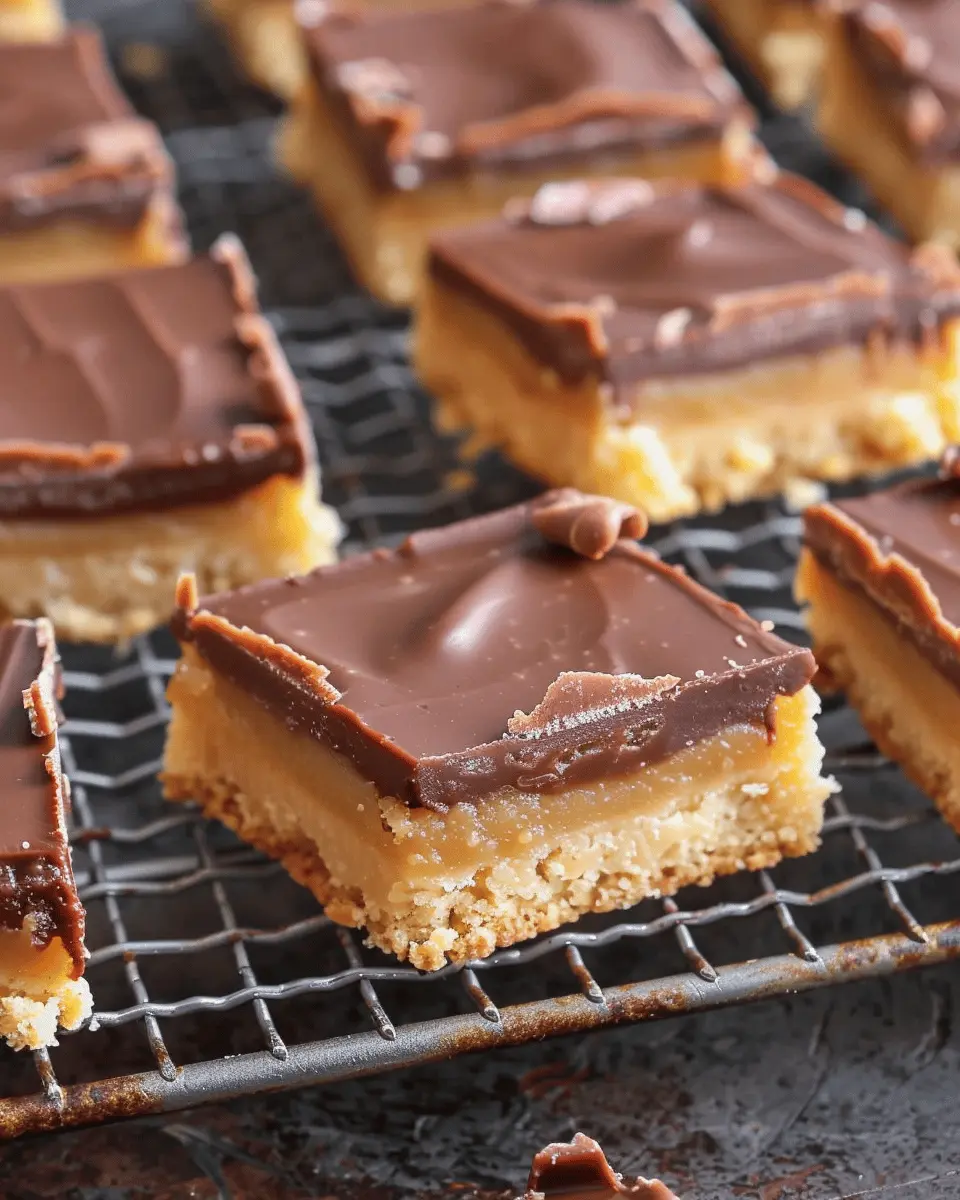
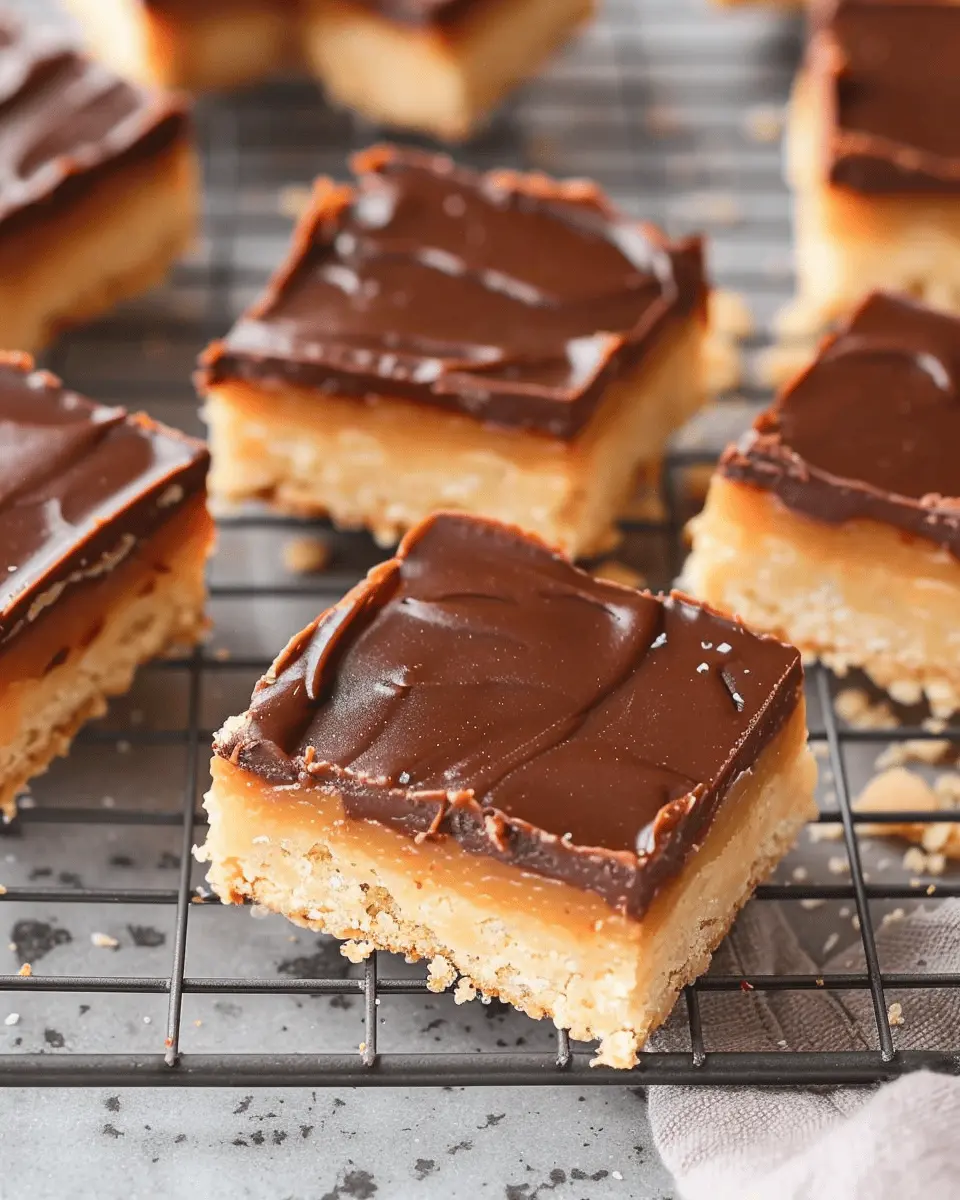
Introduction to Twix Cookie Bars
When it comes to homemade desserts, few creations can rival the sheer indulgence of Twix Cookie Bars. These delicious treats combine the best elements of your favorite cookies and candy bars into one irresistible dessert. Imagine layers of buttery cookie dough, creamy caramel, and rich chocolate coming together to create a flavor explosion that satisfies any sweet tooth!
Why Twix Cookie Bars are a Game Changer for Homemade Desserts
If you’ve ever found yourself pondering what’s missing from your dessert lineup, Twix Cookie Bars are here to change the game. They perfectly balance textures and flavors, offering a delightful cookie base that crumbles just a bit under your bite, paired with a smooth, sticky caramel and a luscious chocolate topping. This combination makes them a hit at any gathering, from casual family dinners to more festive celebrations.
Additionally, Twix Cookie Bars are surprisingly easy to make! Unlike other desserts that require precision baking and specialized skills, this recipe offers a straightforward approach that even novice bakers can master. If you love the idea of homemade treats but dread spending hours in the kitchen, these bars are your ideal solution. They come together in just a few simple steps, allowing you to whip up something fabulous without the fuss.
Beyond their taste and simplicity, these bars also allow for creative customizations. Want to incorporate a hint of salt for that perfect sweet-salty balance? Go for it! Feel like adding some crushed nuts for crunch? That will elevate your bars even further! The opportunities for personalization are endless, making Twix Cookie Bars a fantastic canvas for your culinary creativity.
For those who prioritize health, it’s interesting to note that studies show consuming treats in moderation can actually enhance one’s overall happiness (source: American Journal of Clinical Nutrition). So why not treat yourself and your loved ones to something extraordinary? With their rich taste and customizable nature, Twix Cookie Bars are perfect for any occasion.
Overall, whether you’re looking to impress guests or simply enjoy a delicious dessert at home, Twix Cookie Bars are the answer to your dessert dilemmas. So, are you ready to dive into the world of these delectable treats? Let’s get baking!
Explore more about balancing desserts and health here.
Ingredients for Twix Cookie Bars
Creating your own decadent Twix cookie bars at home is easier than you might think. Let’s break down the essential ingredients you’ll need to get started on this tasty treat!
Essential ingredients for the crust
The foundation of your Twix cookie bars begins with a rich, buttery crust. You’ll need:
- Butter: 1 cup, softened to bring that irresistible flavor.
- Sugar: ½ cup for sweetness that balances the richness.
- All-purpose flour: 2 cups to form a sturdy base.
- Salt: A pinch enhances all the flavors beautifully.
Key ingredients for the caramel layer
What’s a Twix cookie bar without that gooey caramel? These ingredients are essential:
- Caramel candies: 14 ounces, unwrapped for easy melting.
- Heavy cream: 1/4 cup to give your caramel that creamy texture.
- Vanilla extract: 1 teaspoon for an extra layer of flavor.
Chocolate layer components
The final touch is the chocolate layer that brings everything together. You’ll need:
- Chocolate chips: 2 cups, semi-sweet for that classic chocolatey taste.
- Vegetable oil: 1 tablespoon to ensure a smooth melt.
These ingredients are the key to achieving that signature Twix cookie bars vibe right in your kitchen. Happy baking! For more tips, check out resources from BBC Good Food.
Step-by-step Preparation of Twix Cookie Bars
If you’re hunting for a sweet treat that brings the nostalgic flavors of Twix into a cookie bar form, you’ve landed in just the right spot! Making Twix cookie bars at home is a fun and rewarding experience, perfect for impressing friends or indulging your sweet tooth. Here’s how to perfectly prepare these delicious bars, step by step.
Prepping the Crust
The foundation for your Twix cookie bars starts with a buttery, cookie-like crust that’s both chewy and crunchy.
Ingredients:
- 1 cup unsalted butter (softened)
- 1 cup brown sugar
- 2 cups all-purpose flour
- 1/2 teaspoon salt
- 1 teaspoon vanilla extract
Instructions:
- Preheat your oven to 350°F (175°C).
- In a large mixing bowl, cream together the softened butter and brown sugar until light and fluffy. This not only enhances the flavor but also adds that delightful texture.
- Gradually stir in the flour, salt, and vanilla extract until the dough comes together. Make sure it’s mixed well—but don’t overwork it!
Do you want to add a twist? Feel free to throw in a handful of chocolate chips or nuts for extra depth.
Baking the Crust to Perfection
Now that your crust mixture is ready, it’s time to bring it to life in the oven.
- Press the dough evenly into the bottom of a greased 9×13-inch baking pan. You want it to be smooth, so take your time ensuring that the crust is evenly distributed.
- Bake for about 15-18 minutes, or until the edges are golden brown. This baking time is crucial: keep an eye on it to avoid that dreaded over-baking that can lead to a dry crust (and no one wants that!).
Let the crust cool slightly to set the stage for the next delicious layer.
Crafting the Caramel Layer
The caramel layer is where the magic happens. It adds that gooey sweetness that makes Twix cookie bars oh-so-special!
Ingredients:
- 1 cup granulated sugar
- 1/2 cup unsalted butter
- 1/4 cup heavy cream
- 1/4 teaspoon salt
Instructions:
- In a saucepan, combine sugar, butter, and salt over medium heat. Stir occasionally until the mixture starts to boil.
- Once boiling, let it simmer for 4-5 minutes until it thickens slightly. Remove it from heat and carefully stir in the heavy cream. This is where it could get a little tricky! The mixture may bubble up—so be cautious.
- Pour the caramel over the slightly cooled crust, making sure it’s evenly spread.
Combining the Chocolate Layer
Now for the best part: the chocolate!
Ingredients:
- 1 cup semi-sweet chocolate chips
- 1 tablespoon coconut oil (for extra shine)
Instructions:
- In a microwave-safe bowl, combine the chocolate chips and coconut oil. Heat in 30-second intervals, stirring between, until melted and smooth.
- Pour the melted chocolate over the caramel layer. Use a spatula to spread it evenly so every bite has that heavenly chocolate topping.
Assembling and Cooling the Twix Cookie Bars
Your Twix cookie bars are almost complete! But first, we need to give them some time to set.
- Allow the entire pan to cool at room temperature for about 30 minutes before transferring it to the refrigerator for at least 2 hours. This will ensure that everything sets perfectly and allows the layers to marry beautifully.
- Once chilled, use a sharp knife to cut them into squares or bars—try to make them uniform for that Instagram-perfect look!
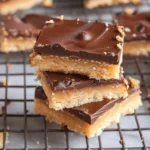
And there you have it! You’ve just made your own Twix cookie bars that rival the original. The combination of the cookie base, gooey caramel, and rich chocolate is simply irresistible.
So, are you ready to share these delectable homemade delights with friends, or are you opting for a cozy night in with your sweet stash? Enjoy every bite!
For additional tips and flavor variations, check out sites like Serious Eats or Bon Appétit. Happy baking!
Variations on Twix Cookie Bars
Adding nuts for extra crunch
If you’re a fan of texture in your desserts, adding nuts to your Twix cookie bars can elevate the experience significantly. Imagine biting into a crunchy layer of toasted almonds or walnuts that complements the chewy caramel and smooth chocolate. Not only do they add a delightful crunch, but they also introduce healthy fats and protein to your treat.
- Almonds: Slice them thinly for a subtle flavor.
- Pecans: Their buttery taste pairs beautifully with the caramel.
- Hazelnuts: Chopped hazelnuts offer a slightly sweet and earthy note.
You could even mix a combination of these nuts to create a rich tapestry of flavors. Just be sure to toast them lightly before scattering them atop the caramel layer for that ideal crunch!
Different flavors of chocolate
While classic milk chocolate is a staple, experimenting with different types of chocolate can turn your Twix cookie bars into an adventure for the taste buds. Why not try?
- Dark Chocolate: For a more intense flavor, dark chocolate provides a rich experience that’s slightly less sweet.
- White Chocolate: If you’re leaning towards something sweeter, white chocolate offers a creamy, dreamy coating that harmonizes nicely with the cookie and caramel.
- Flavored Chocolate: Infused chocolates, like orange or raspberry, can add a fruity twist. It’s an excellent way to make your bars stand out!
Next time you whip up a batch, consider mixing and matching to find your new favorite flavor profile. You can even check out resources like Chocolate.org for unique chocolate options.
Variations make cooking fun and personal! Have you tried creating your own twist on classic recipes? What unique flavors have you explored?
Cooking Tips and Notes for Twix Cookie Bars
Tips for the Perfect Caramel Consistency
Getting that rich, gooey caramel for your Twix cookie bars is essential for delicious layers. Here’s how to achieve it:
- Start with room temperature ingredients: This helps the sugars melt evenly.
- Use a candy thermometer: Aim for a soft-ball stage (around 240°F). This ensures it thickens perfectly without burning.
- Stir patiently: Don’t rush! Stirring constantly allows sugars to cook evenly, avoiding that grainy texture. If you’re unsure, check this guide on caramel making.
Storing and Freezing Cookie Bars
To keep your Twix cookie bars fresh for longer, here are some storage tips:
- Room temperature: Store them in an airtight container for up to a week.
- Freezing: Individually wrap the bars in plastic wrap and place them in a freezer-safe bag. They’ll last for up to three months!
- Thawing: Just take them out and let them sit at room temperature for about 30 minutes for the best texture.
These simple steps will ensure you can enjoy your decadent treats whenever the craving strikes!

Serving Suggestions for Twix Cookie Bars
Ideal Pairings with Coffee or Tea
Twix cookie bars are a delightful treat, and they pair wonderfully with your favorite coffee or tea. Imagine enjoying a warm cup of freshly brewed coffee alongside a rich, chewy bar; the contrast of flavors is simply irresistible. If you’re a tea lover, consider choosing a bold chai or a smooth Earl Grey, both of which harmonize beautifully with the caramel and chocolate notes of the cookie bars.
When planning a cozy gathering, you might even want to offer a selection of both drinks. Did you know that pairing sweet treats with coffee can enhance the overall flavor experience? According to experts, the acidity in coffee can balance out the richness of desserts, making each bite more enjoyable. For a unique twist, try serving your Twix cookie bars with whipped cream or a scoop of vanilla ice cream for that extra indulgent touch.
Presentation Ideas for Gatherings
Presentation goes a long way when you’re serving Twix cookie bars. Here are a few ideas to impress your guests:
- Elegant platters: Arrange the bars on a decorative platter for a stylish touch.
- Individual servings: Cut them into bite-size pieces and serve in mini cupcake liners for a fun, grab-and-go option.
- Garnishes: Drizzle some extra chocolate or caramel sauce over the bars before serving for that gourmet look.
These simple ideas can elevate your dessert table and make your Twix cookie bars the star of the show!
For more tips on entertaining, check out The Spruce Eats, a fantastic resource for home hosting and presentation ideas.
Time Breakdown for Twix Cookie Bars
When diving into the delicious world of Twix cookie bars, knowing how to manage your time will make the process enjoyable and stress-free. Here’s a quick glance at each stage:
Preparation Time
Get ready to roll! You’ll need about 20 minutes to gather your ingredients and prepare your cookie base. Make sure your butter is softened and your eggs are at room temperature for that perfect blend.
Baking Time
Pop those Twix cookie bars in the oven for 25-30 minutes. Keep an eye on them! You want them golden brown but not overdone.
Cooling Time
Once they’re out, patience is key. Let your bars cool in the pan for at least 15 minutes before slicing. This helps them set properly without falling apart.
With these time estimates, you can tackle your baking project like a pro! For more tips on perfecting your cookie game, check out sites like Bon Appétit for inspiration!
Nutritional Facts for Twix Cookie Bars
Calories per bar
When indulging in these Twix cookie bars, each one comes in at approximately 200 calories. While they’re a delightful treat, it’s good to be mindful of how they fit into your daily calorie goals. Enjoying them in moderation can allow you to savor their taste without the guilt.
Highlights on sugars and fats
These sweet bars will tempt your taste buds with about 12 grams of sugar per serving, primarily coming from the chocolate and caramel layers. They also contain around 10 grams of fat, contributing to a rich, creamy texture. For more health-conscious options or substitutes, check out resources like the American Heart Association that can guide you toward balancing your diet.
Remember, while Twix cookie bars are certainly a treat, pairing them with fresh fruit or a side of nuts can help create a more balanced snack experience. Adding whole foods to satisfy those cravings could be a fun way to enjoy your treats while also being mindful of your nutrition!
FAQs about Twix Cookie Bars
When creating your delicious Twix cookie bars, you might have a few questions. Don’t worry; I’ve got the answers to help you through the process!
Can I make these bars gluten-free?
Absolutely! To whip up gluten-free Twix cookie bars, simply swap out regular flour for a high-quality gluten-free flour blend. Brands like King Arthur and Bob’s Red Mill offer great options that work well in baking. Just be sure to check that all other ingredients, especially anything processed, are gluten-free; you’d be surprises how many common items might contain gluten.
How do I ensure my caramel doesn’t burn?
Making caramel can be trickier than it seems! To avoid a burnt disaster, consider the following tips:
- Use a heavy-bottomed saucepan: This ensures more even heat distribution.
- Keep an eye on it: Stir frequently, especially once the sugar starts to melt.
- Use a thermometer: Aim for 240°F (the soft ball stage) for perfect results.
Check out this guide on making caramel for additional insights.
What’s the best way to store leftovers?
Storing your leftover Twix cookie bars is easy! You can keep them in an airtight container at room temperature for about 3-5 days. If you want to prolong their life, consider refrigerating them, which can extend freshness up to a week. For even longer storage, freeze them in a sealed container or freezer bag; they can last for up to three months. Just make sure to separate layers with parchment paper to prevent sticking!
By keeping these tips in mind, you can enjoy your Twix cookie bars without a hitch! Happy baking!
Conclusion on Twix Cookie Bars
Why you should try making Twix Cookie Bars at home!
Making Twix cookie bars at home is an adventure in both baking and indulgence. Not only do you control the ingredients, ensuring freshness and quality, but you also get the satisfaction of creating a beloved treat from scratch. Imagine the rich combination of buttery cookie, creamy caramel, and smooth chocolate right from your oven!
Plus, this is a perfect recipe for gatherings, guaranteed to impress your friends and satisfy your cravings. Who wouldn’t want to share a homemade dessert? So grab your ingredients, channel your inner baker, and give these Twix cookie bars a try — your taste buds will thank you!
PrintTwix Cookie Bars: The Indulgent Treat You Can Make at Home
These Twix Cookie Bars combine the classic flavors of caramel, chocolate, and cookie for a delicious homemade treat.
- Prep Time: 20 minutes
- Cook Time: 25 minutes
- Total Time: 45 minutes
- Yield: 16 bars 1x
- Category: Dessert
- Method: Baking
- Cuisine: American
- Diet: Vegetarian
Ingredients
- 1 cup all-purpose flour
- 1/2 cup unsweetened cocoa powder
- 1/2 cup granulated sugar
- 1/2 cup brown sugar
- 1/2 cup unsalted butter, softened
- 1 large egg
- 1 teaspoon vanilla extract
- 1 cup caramel candies
- 1/4 cup heavy cream
- 1 cup milk chocolate chips
Instructions
- Preheat the oven to 350°F (175°C).
- In a bowl, mix flour, cocoa powder, granulated sugar, brown sugar, and butter until crumbly.
- Add the egg and vanilla extract, mixing until a dough forms.
- Press the dough into a greased baking dish and bake for 15 minutes.
- In a saucepan, combine caramel candies and heavy cream over low heat until smooth.
- Pour the caramel over the baked crust.
- Sprinkle chocolate chips on top and return to the oven for another 10 minutes.
- Let cool before cutting into bars.
Notes
- For a richer flavor, use dark chocolate chips instead of milk chocolate.
- Make sure to let the bars cool completely before slicing for cleaner edges.
Nutrition
- Serving Size: 1 bar
- Calories: 250
- Sugar: 18g
- Sodium: 150mg
- Fat: 12g
- Saturated Fat: 7g
- Unsaturated Fat: 4g
- Trans Fat: 0g
- Carbohydrates: 35g
- Fiber: 1g
- Protein: 3g
- Cholesterol: 30mg
Keywords: Twix Cookie Bars, homemade dessert, chocolate bars, cookie recipe