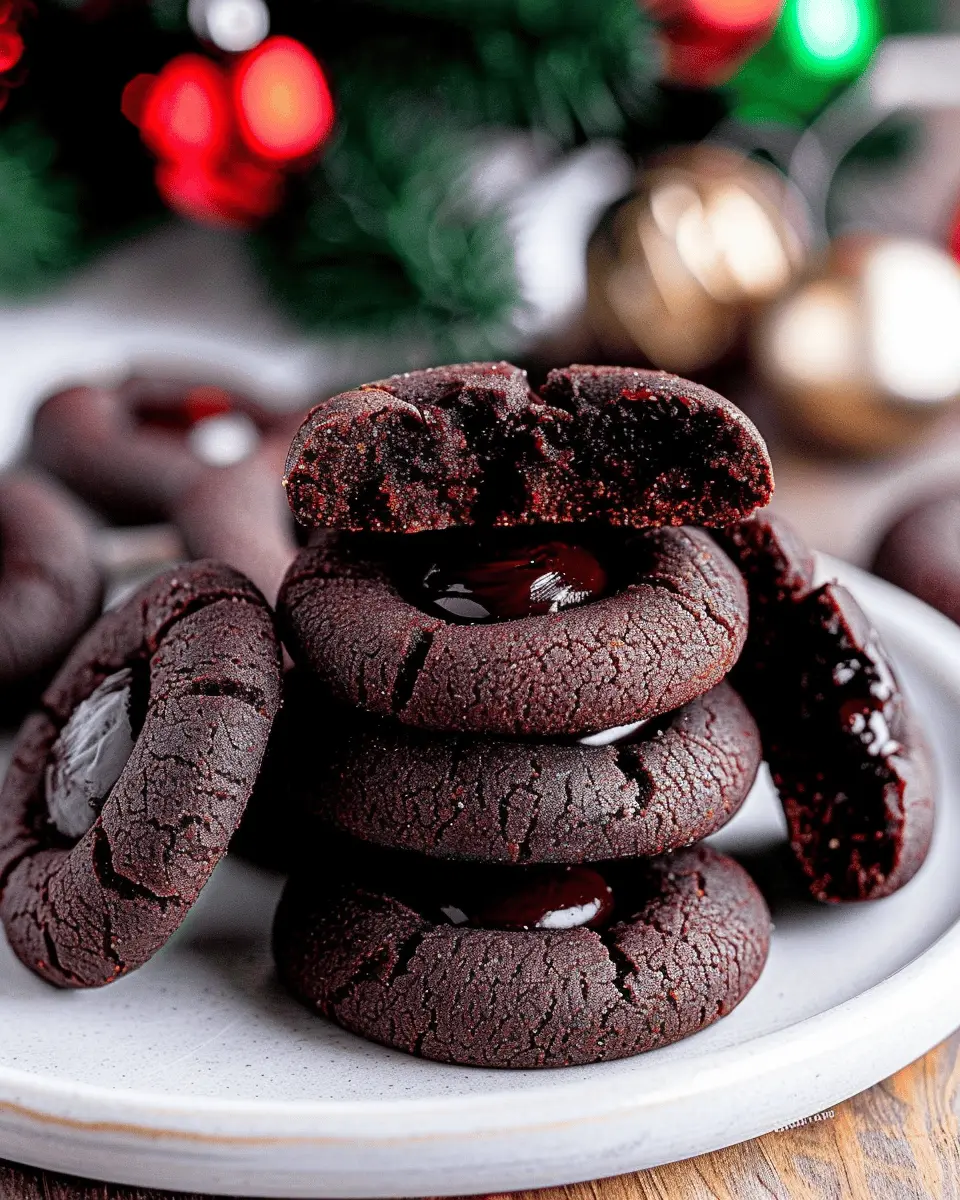
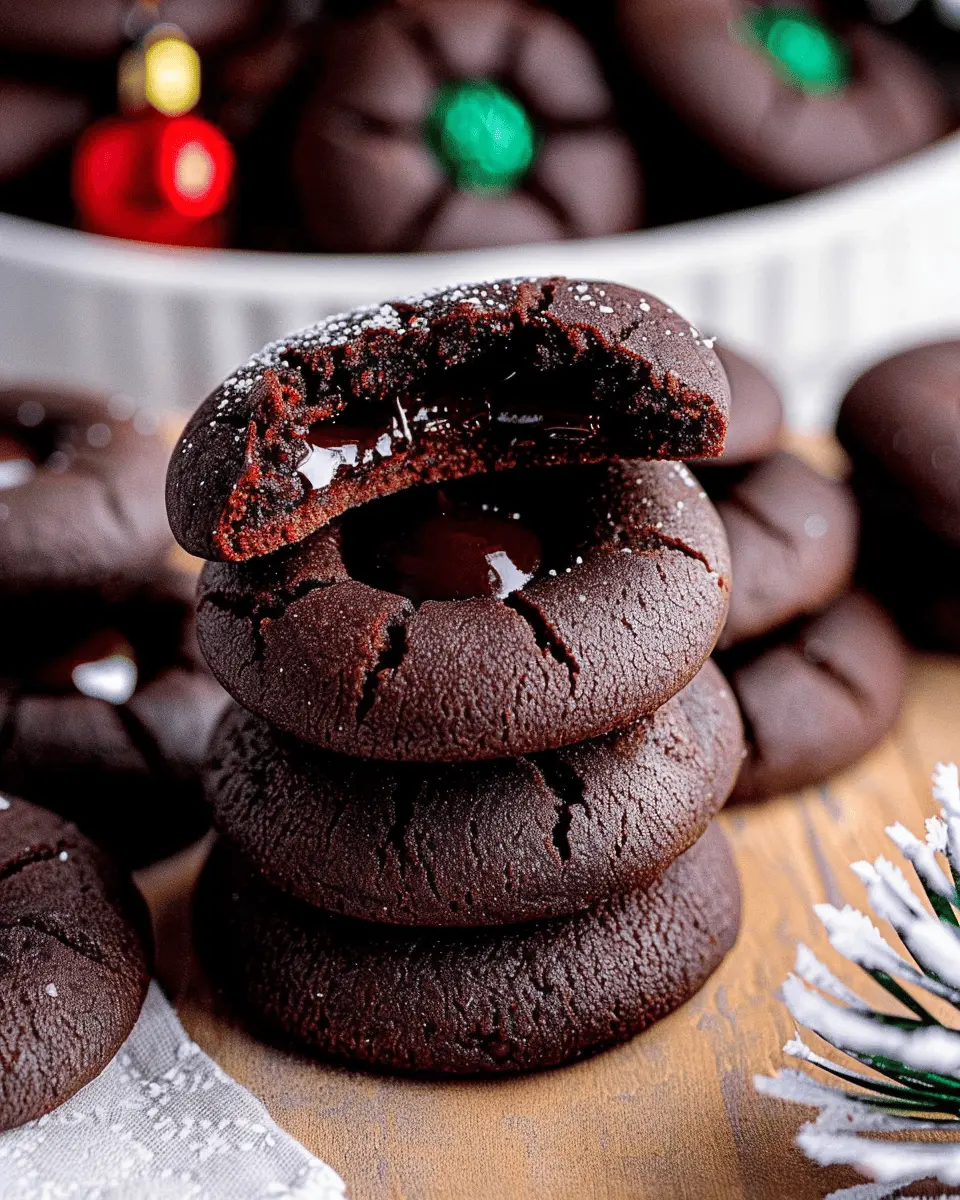
Introduction to Chocolate Thumbprint Cookies
When it comes to delightful treats, Chocolate Thumbprint Cookies hold a special place in the hearts of many. These cookies are not just visually appealing with their lovely chocolate centers; they also deliver a burst of flavor in every bite. Perfect for sharing at gatherings or enjoying as a mid-afternoon snack, these cherished sweets are sure to impress friends and family alike.
Why Chocolate Thumbprint Cookies are a Must-Try
So, what makes Chocolate Thumbprint Cookies a standout choice for your baking repertoire? Let’s explore a few compelling reasons.
-
Simplicity Meets Deliciousness: The beauty of thumbprint cookies lies in their straightforward preparation. With no need for elaborate techniques, you can whip up a delicious batch in no time. Just mix the dough, make an indentation with your thumb, and fill it with smooth chocolate—perfection achieved with minimal effort!
-
Endless Flavor Combinations: While the classic chocolate filling is irresistible, the canvas these cookies provide opens the door to creativity. You can experiment with different fillings, such as fruit preserves, nut butters, or even caramel. Check out resources like Allrecipes for some innovative variations to personalize your cookies.
-
Ideal for Any Occasion: Whether you need a sweet treat for a birthday party, a holiday gathering, or just because—it’s always cookie season! Chocolate Thumbprint Cookies are both charming and sophisticated, making them an excellent choice for any gathering. Plus, they make a lovely gift when presented in a decorative box.
-
Perfect for Stress Relief: Baking is not just about the end product; it can also be a therapeutic experience. According to experts, engaging in simple cooking activities like baking can significantly reduce stress levels. So, the next time you feel overwhelmed, take a moment to roll up your sleeves and enjoy creating these delectable cookies.
In the world of baked goods, few treats can compete with the nostalgia and joy that Chocolate Thumbprint Cookies bring. They’re not just cookies; they’re a delightful experience. So, grab your apron, and let’s dive into creating these irresistible delights!
Ingredients for Chocolate Thumbprint Cookies
Essential ingredients for a delightful cookie experience
Creating Chocolate Thumbprint Cookies is a delightful venture, and the right ingredients can make all the difference! Here’s a breakdown of what you’ll need for these rich, chocolatey treats that are sure to impress.
- All-purpose flour: This forms the base of your cookies and gives them that lovely chewy texture.
- Cocoa powder: Using quality cocoa powder will provide a deep, rich chocolate flavor.
- Granulated sugar: It sweetens your cookies perfectly, balancing the cocoa’s intensity.
- Brown sugar: This adds moisture and a hint of caramel flavor.
- Unsalted butter: Creamy butter enhances the cookie’s richness; make sure it’s softened for easier mixing.
- Egg: This helps bind everything together and adds structure.
- Vanilla extract: A splash adds warmth and depth to the overall flavor profile.
- Salt: Just a pinch boosts all the other flavors.
You’ll also want your choice of chocolate for the thumbprint filling—perhaps a luscious chocolate ganache or a fruity jam for a twist!
For more tips on ingredient quality, check out resources like King Arthur Baking and Serious Eats for the best choices and techniques to enjoy baking your cookies to perfection.
Step-by-step Preparation of Chocolate Thumbprint Cookies
Creating delightful Chocolate Thumbprint Cookies is a fun and enjoyable process that results in a scrumptious treat perfect for any occasion. These cookies combine the richness of chocolate with a luscious filling, making them irresistible. Let’s take a closer look at how to prepare them step-by-step!
Gather Your Ingredients
Before diving into the fun of baking, it’s essential to gather all your ingredients. Here’s what you’ll need for your Chocolate Thumbprint Cookies:
- 1 cup unsalted butter, softened
- 1 cup granulated sugar
- 1 cup brown sugar, packed
- 2 cups all-purpose flour
- ½ cup unsweetened cocoa powder
- 1 teaspoon baking powder
- ½ teaspoon salt
- 2 teaspoons vanilla extract
- 1 egg
- 1 cup chocolate chips (for the ganache)
Having all these ingredients ready will streamline your baking process and ensure you don’t miss a crucial component!
Mix the Dry Ingredients
In a mixing bowl, sift together your dry ingredients:
- All-purpose flour
- Unsweetened cocoa powder
- Baking powder
- Salt
Sifting helps eliminate lumps and ensures a smoother batter, which is vital for the perfect cookie texture. Take a moment and enjoy the rich cocoa aroma wafting through your kitchen!
Cream the Butter and Sugars
In a separate large bowl, cream together the softened unsalted butter, granulated sugar, and brown sugar until the mixture is light and fluffy. This process usually takes about 2-3 minutes with an electric mixer. At this point, you’re creating the heart of your Chocolate Thumbprint Cookies. The fluffy mix will contribute to the cookies’ tender texture.
Combine Wet and Dry Mixtures
Now, it’s time to introduce the wet ingredients! Add the egg and vanilla extract to your creamed mixture, and mix well. Gradually incorporate your dry mixture until everything is combined. Don’t be afraid to get in there with a spatula or your hands to blend it well! The dough should come together nicely, forming a soft, workable consistency.
Shape the Cookie Dough
Once your dough is ready, it’s shaping time! Scoop out about a tablespoon of dough and roll it into a ball. Place the balls on a parchment-lined baking sheet about two inches apart. Now, here’s where the fun comes in—using your thumb, gently press down in the center of each ball to create a little indention. Don’t press too hard; you want a pocket for that glorious ganache!
Chill the Cookie Dough
Chilling your cookie dough is a key step. It helps the cookies maintain their shape while baking. Pop the cookie sheet in the refrigerator for about 30 minutes. During this time, you can clean up your workspace or even think about what filling you want to add later.
Bake the Cookies
Preheat your oven to 350°F (175°C). After chilling, bake your cookies for about 10-12 minutes or until firm. Keep an eye on them! The edges should be slightly crispy, while the centers should still be soft. Allow them to cool on the baking sheet for a few minutes before transferring them to a wire rack.
Prepare the Chocolate Ganache
While your cookies are cooling, let’s whip up a quick chocolate ganache. Place your chocolate chips in a heat-safe bowl. Then, heat about ½ cup of heavy cream in a saucepan until it just begins to simmer. Pour the hot cream over the chocolate chips and let sit for a minute. Whisk until smooth and glossy. This is where things get decadent!
Assemble the Cookies
Once the cookies are completely cooled, it’s time to fill those thumbprints! Use a spoon or small piping bag to fill each indented center with the warm chocolate ganache. Allow them to set for a few minutes—if you can resist the urge to snag one right away!
And there you have it—the step-by-step preparation for making delectable Chocolate Thumbprint Cookies. Not only are they perfect for parties or gift-giving, but they also are a pleasurable treat for those cozy evenings in. Happy baking!

Variations on Chocolate Thumbprint Cookies
Nutty Chocolate Thumbprint Cookies
If you’re looking to elevate your classic Chocolate Thumbprint Cookies, why not add some nutty goodness? Almonds, hazelnuts, or walnuts can create a delicious twist. Simply incorporate ground nuts into your dough or sprinkle them atop the cookies before baking. The nutty flavor complements the rich chocolate beautifully and adds a delightful crunch. For an extra burst of flavor, try filling your thumbprints with almond or hazelnut spread!
If you’re curious about how nuts can enhance flavor and texture, the benefits are numerous. Nuts provide healthy fats and protein, making your cookies feel a bit more substantial. Plus, a study from the American Journal of Clinical Nutrition shows that incorporating nuts into your diet can improve heart health.
Spiced Chocolate Thumbprint Cookies
For those who crave a bit of warmth in their cookies, consider trying Spiced Chocolate Thumbprint Cookies. Imagine a sprinkle of cinnamon or a dash of chili powder added to your dough, creating a cozy, unexpected flavor profile. Ginger can add a zesty warmth that pairs perfectly with chocolate.
Feeling adventurous? You could even mix in some pumpkin spice for a seasonal touch! The spices not only add flavor but can also enhance the aroma, enticing anyone nearby. Research indicates that spices can boost metabolism and have various health benefits, making these cookies a treat you can feel good about enjoying.
As you explore these variations, don’t hesitate to experiment and find your favorite! Whether it’s a nutty crunch or a spicy kick, each twist on the classic Chocolate Thumbprint Cookies opens up a new world of flavors and enjoyment.
Cooking Tips and Notes for Perfect Chocolate Thumbprint Cookies
Measuring Flour Correctly
To achieve the perfect texture in your chocolate thumbprint cookies, measuring flour accurately is crucial. Instead of scooping directly from the bag, use the spoon-and-level method. Lightly spoon flour into your measuring cup, and then level it off with a knife. This can prevent dense cookies that result from packing too much flour. Remember, a kitchen scale can be your best friend—4.25 ounces per cup is a consistently reliable target for all-purpose flour.
Using Quality Chocolate for Ganache
When it comes to the glossy chocolate ganache that fills your thumbprints, using high-quality chocolate is a game-changer. Look for dark chocolate with at least 60% cocoa for a rich flavor that beautifully complements the cookie. Brands like Guittard or Valrhona are excellent choices. Not only will this enhance the overall taste, but it also creates a smooth, melt-in-your-mouth texture.
Always temper your ganache to avoid a gritty texture, and consider adding a pinch of salt to elevate the flavors. For further techniques on chocolate handling, check out this chocolate-making guide.
Now, roll up your sleeves and get ready to bake your scrumptious chocolate thumbprint cookies!
Serving Suggestions for Chocolate Thumbprint Cookies
Pairing with Coffee or Tea
What’s better than indulging in Chocolate Thumbprint Cookies with a warm cup of coffee or tea? The rich, chocolatey goodness of these cookies complements the robust flavors of coffee beautifully. If you’re adventurous, consider a creamy latte or a spiced chai. Did you know that coffee can enhance the sweetness of chocolate? According to a study by the National Coffee Association, the aroma of coffee and chocolate creates a delightful sensory experience.
Creative Presentation Ideas
Make your Chocolate Thumbprint Cookies the star of the show with some simple yet elegant presentation ideas:
- Cookie Stands: Arrange them on a decorative platter or use tiered stands for a charming display.
- Gift Boxes: Package them in cute, colorful boxes tied with a ribbon for a thoughtful gift.
- Themed Platters: Pair with seasonal fruits or nuts to create an eye-catching dessert board.
Feel free to explore more about creative ways to present desserts on sites like The Spruce Eats. With thoughtful pairing and creative presentation, your Chocolate Thumbprint Cookies will impress everyone at your next gathering!
Time Breakdown for Making Chocolate Thumbprint Cookies
When you’re ready to impress your friends and family with delicious Chocolate Thumbprint Cookies, it’s good to know how long the process is going to take. Here’s a quick breakdown!
Preparation Time
Getting everything ready takes about 20 minutes. This includes gathering your ingredients, mixing the dough, and shaping the cookies. Don’t rush this part—enjoy the process!
Cook Time
Baking these Chocolate Thumbprint Cookies won’t take long at all—it’s just 12 to 15 minutes in the oven. Perfect time to clean up or prepare your filling!
Total Time
All summed up, you’re looking at around 35 to 40 minutes from start to finish. A small investment for delightful cookies that will disappear quickly!
For more tips on baking and decorating, check out this guide on cookie variations that can elevate your treat.
Nutritional Facts for Chocolate Thumbprint Cookies
When it comes to indulging in sweet treats, Chocolate Thumbprint Cookies offer a delightful balance of flavor and nutrition. Let’s break down the key nutritional components, so you can enjoy these cookies guilt-free.
Calories Per Serving
Each Chocolate Thumbprint Cookie typically contains around 100 calories. This makes them a satisfying, yet not overly indulgent, dessert option for those looking to manage their calorie intake while still enjoying a treat.
Sugar Content
These cookies are undeniably sweet, with approximately 8 grams of sugar per serving. While a touch of sweetness is necessary for flavor, it’s always worth keeping an eye on sugar intake. Consider using alternatives like honey or maple syrup for a healthier twist.
Fat Content
In every Chocolate Thumbprint Cookie, you’ll find about 5 grams of fat. Much of this comes from butter or oil, which not only adds richness but also helps create that perfect texture. Using alternatives like coconut oil or reducing the amount can make these cookies a bit more heart-healthy.
Want more insights about the nutritional aspects of your favorite desserts? Check out this comprehensive guide on dessert moderation strategies.
FAQs About Chocolate Thumbprint Cookies
When diving into the delightful world of Chocolate Thumbprint Cookies, you might have some pressing questions. Let’s tackle the most common ones for a smoother baking experience!
Can I freeze the dough?
Absolutely! Freezing the dough is a great way to prepare in advance. Once you’ve formed the thumbprint shapes, place them on a baking sheet and freeze until firm, then transfer to an airtight container. You can store it in the freezer for up to three months. When you’re ready to bake, simply let them thaw in the fridge overnight or for a couple of hours at room temperature before baking.
What chocolate works best for ganache?
For the ganache, high-quality chocolate is key to enhancing the flavor of your Chocolate Thumbprint Cookies. Opt for semi-sweet or dark chocolate with a cocoa content of 60-70%. Ghirardelli or Callebaut are fantastic brands that consistently deliver rich taste and smooth texture. If you’re feeling adventurous, consider experimenting with flavored chocolates, like orange or espresso, to add a unique twist.
How can I store the finished cookies?
To keep your cookies fresh and delicious, store them in an airtight container at room temperature. Make sure they’re completely cool before sealing, as any warmth can create moisture and affect the texture. They should stay tasty for about a week—though, let’s be honest, they might not last that long! For longer storage, you could also freeze the baked cookies, layering them between parchment paper in an airtight container. Just thaw them at room temperature when you’re ready to indulge again.
For tips on storage and more baking inspiration, check out Baking Tips for Success. Happy baking!
Conclusion on Chocolate Thumbprint Cookies
The Final Word on Making Your Own Treats
Creating your own Chocolate Thumbprint Cookies can be a rewarding experience that fills your kitchen with delightful aromas and your heart with joy. These cookies not only bring a touch of nostalgia but also allow you to customize flavors and fillings to suit your taste.
Think about experimenting with different fillings or chocolate types; the possibilities are endless! Plus, baking at home can be more economical compared to store-bought options. If you’re looking for a sense of accomplishment (and a delicious treat to share), give this recipe a try. Who doesn’t love indulging in homemade goodness? For more inspiration, check out Baking at Home or The Cookie Book for ideas on elevating your baking game.
PrintChocolate Thumbprint Cookies: Easy and Indulgent for Every Occasion

These Chocolate Thumbprint Cookies are the perfect treat for any occasion. With a rich chocolate base and a delightful filling, they’re sure to please any sweet tooth.
- Prep Time: 20 minutes
- Cook Time: 12 minutes
- Total Time: 32 minutes
- Yield: 24 cookies 1x
- Category: Dessert
- Method: Baking
- Cuisine: American
- Diet: Vegetarian
Ingredients
- 1 cup all-purpose flour
- 1/2 cup unsweetened cocoa powder
- 1/2 cup granulated sugar
- 1/2 cup butter, softened
- 1/4 cup powdered sugar
- 1 large egg yolk
- 1 teaspoon vanilla extract
- 1/2 cup chocolate chips for filling
Instructions
- Preheat the oven to 350°F (175°C).
- In a bowl, cream together the butter, sugar, and powdered sugar until smooth.
- Add the egg yolk and vanilla extract, mix well.
- Gradually add the flour and cocoa powder, mixing until combined.
- Scoop out small portions of dough and roll into balls.
- Place on a baking sheet and make an indentation in the center with your thumb.
- Fill each indentation with a chocolate chip.
- Bake for 10-12 minutes, then let cool completely.
Notes
- For a variation, try using different types of chocolate for the filling.
Nutrition
- Serving Size: 2 cookies
- Calories: 150
- Sugar: 10g
- Sodium: 50mg
- Fat: 8g
- Saturated Fat: 5g
- Unsaturated Fat: 3g
- Trans Fat: 0g
- Carbohydrates: 18g
- Fiber: 1g
- Protein: 2g
- Cholesterol: 15mg
Keywords: Chocolate Thumbprint Cookies